


During our first week at the Data School, we're introduced to Tableau Prep - a data preparation tool that you're probably familiar with if you're reading this blog. To get to grips with learning how to use Tableau Prep, we use Preppin' Data challenges as these offer a great opportunity to test out different steps in action. It's a steep learning curve to begin with (or at least, I was a little lost on how to complete certain steps at the start simply because I didn't know what was possible) but once you've got to grips with things, you'll feel much more confident completing challenge after challenge after challenge!
But Tableau Prep isn't the only data preparation tool that we learn during training - we're also introduced to Alteryx and Power Query. However, they don't have dedicated challenges to practise your skills. That's why one of the best things that I learned during training was about adaptability. If you can do something in Tableau Prep, you should be able to do it in Alteryx and Power Query. The method might not be the same and the steps you need to take might be more difficult or they could be easier, but you should be versatile all the same. And that's why I felt I learnt some of my valuable lessons by performing those data prep challenges not only in Tableau Prep but also in Alteryx and Power Query.
Today, we'll be walking through how to complete the Week 1 Preppin' Data Challenge from 2023 in Tableau Prep initially. We'll then compare how to complete this in Alteryx and Power Query as well to gain a stronger understanding of the tools themselves and the differences between them. To note, we'll be focussing on output 2 as the general steps for output 1 (splitting and summarising) are covered in output 2 anyway. Output 3 is also more of the same so completing output 2 maximises the efficiency of our learning!
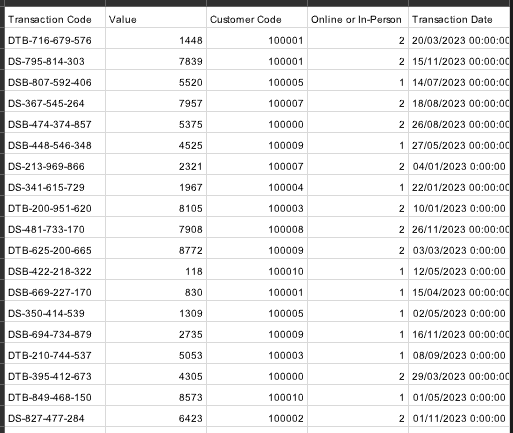
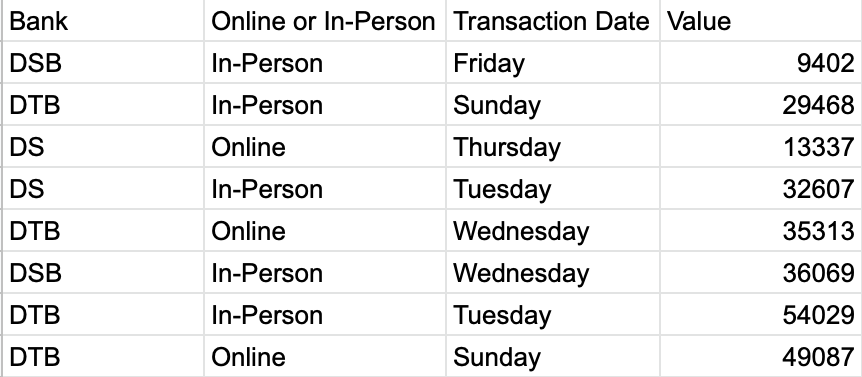
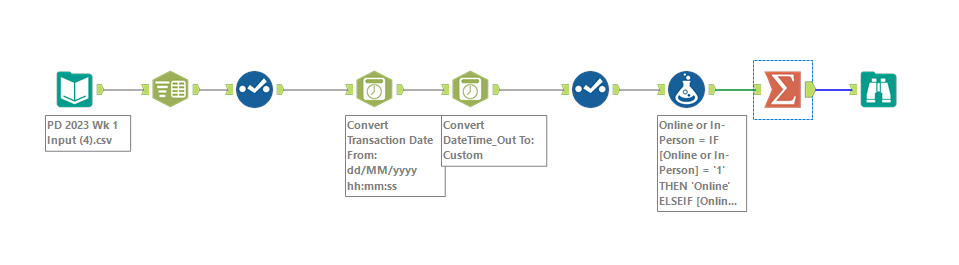
Tableau Prep
Let's begin our step-by-step in the platform that this challenge was designed for. All of the challenges do come with written and video solutions specific to Tableau Prep in case you wanted to try other challenges on your own, but we'll still walk through today's challenge together so you don't have to flick between two tabs. I'm also just going to go through how I would complete the challenge which might not be the exact same method as the publishers.
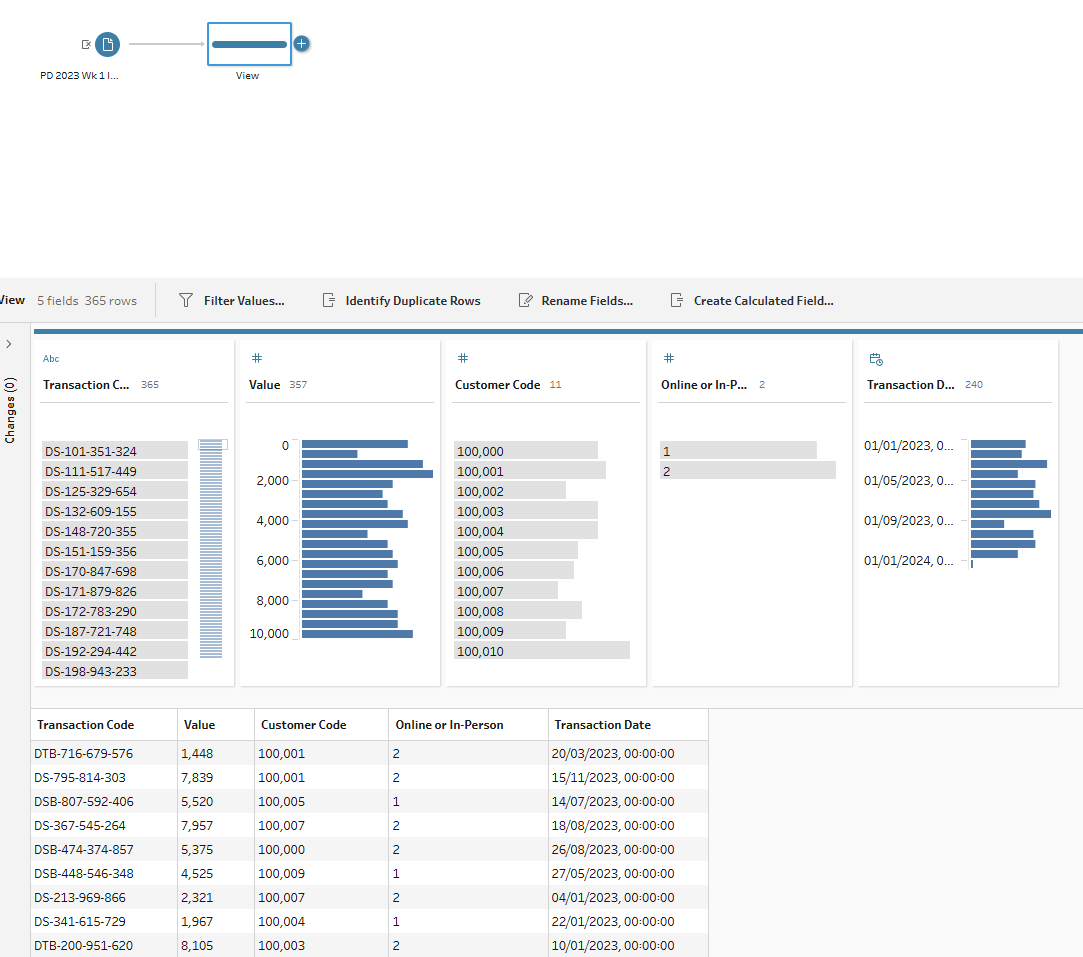
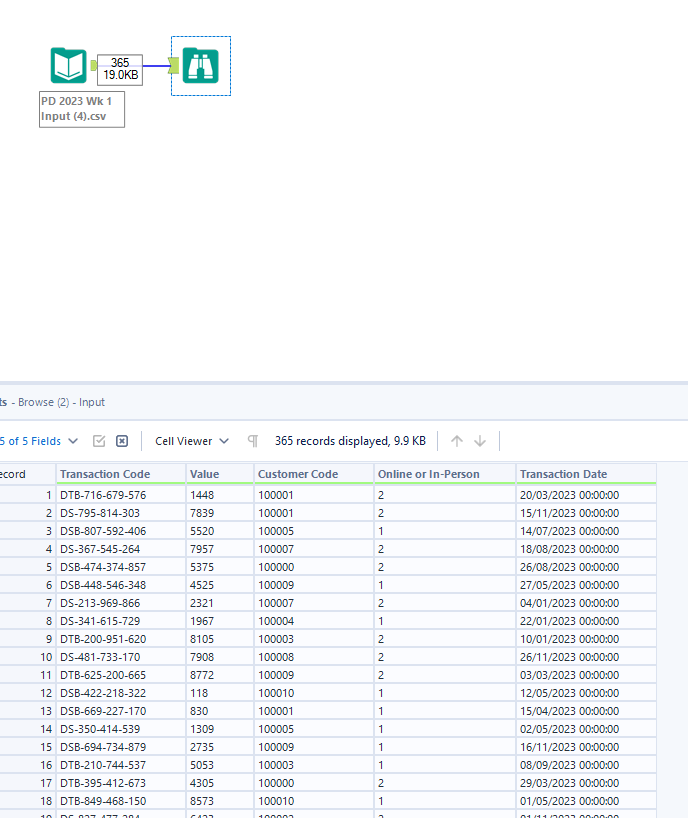
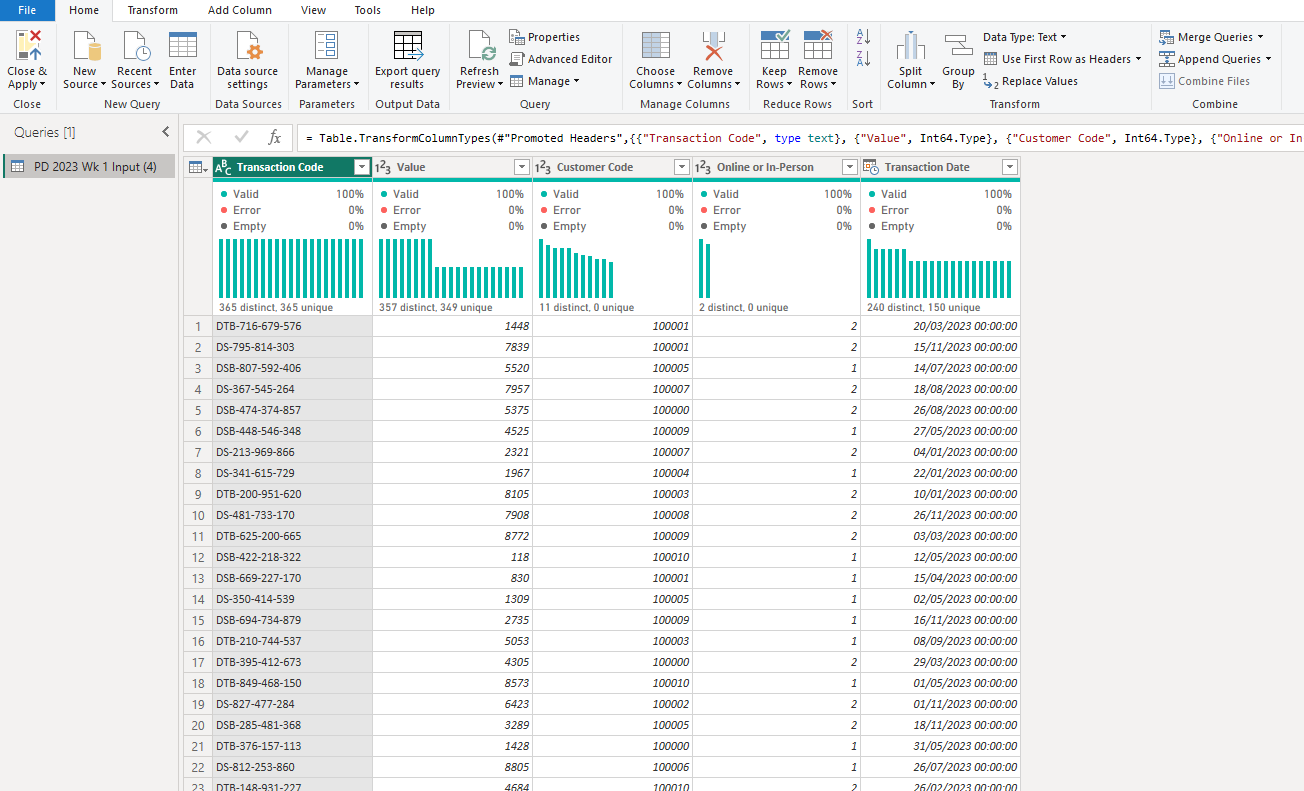
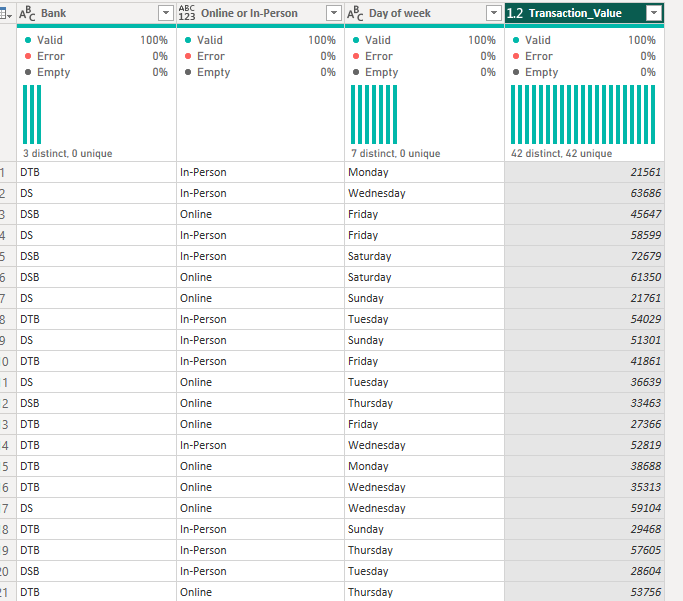
Step 1: Connect to the csv file and view the data.
This part's fairly self-explanatory. I was always taught to start with a clean step where I could view how the data looked and I think that was an excellent tip. I use this even when I know how the data is formatted just to check everything's loaded correctly and my data types are accurate.
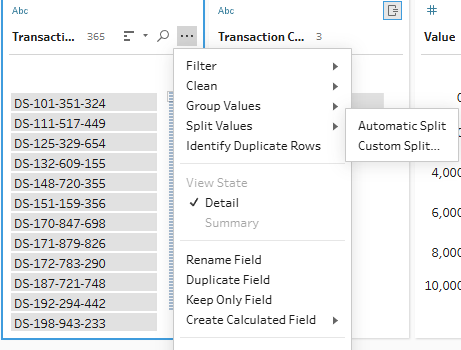
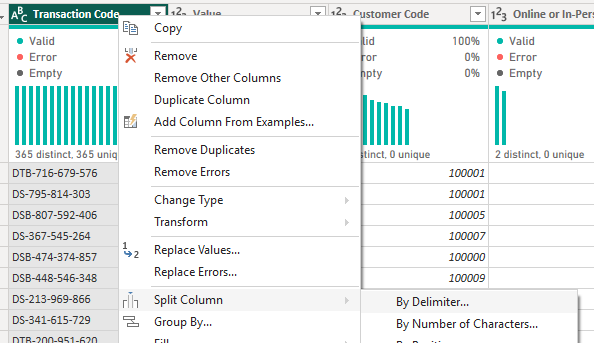
Step 2: Convert the transaction code.
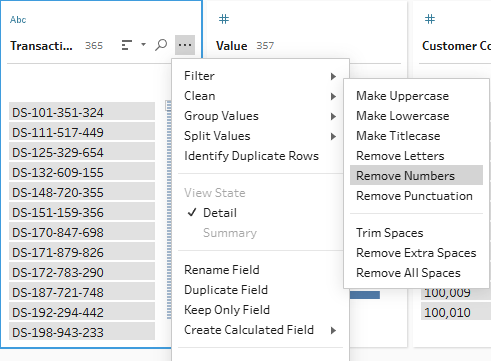
To get the bank that you see in the output you have to split the transaction code, keeping only the section of text before the first hyphen. Alternatively, you could clean the transaction code of numbers and punctuation but I feel like the initial suggestion demonstrates greater proficiency. Maybe I'm just making life more complicated than it needs to be though!
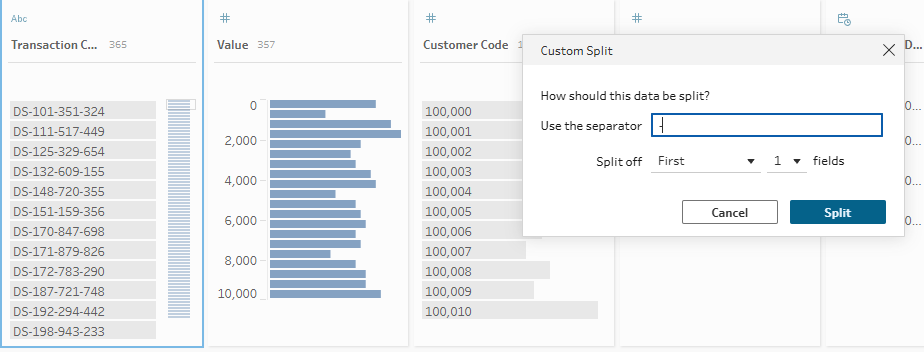
Start by adding a clean step to your workflow. You should always add a new step to your workflow when doing something new to your data to keep track of what you've done. To create a custom split, go to the three dots in the corner of your chosen field. Scroll down to split values > custom split.
Then set up your custom split in the same format as the image below.
Then delete your original column and rename your new split column as Bank.
If you wanted to use the data cleaning method, simply go to the three dots in the corner of the transaction code field and click on clean. Then, in two separate steps, you'll need to remove numbers and punctuation. You'll also need to rename the field as Bank like above.
Step 3: Convert date to day of week.
Tableau Prep is very kind to us as it has a very simple conversion option from date to day of week. Add your new clean step and go to the three dots in the corner of your date field, select convert dates and opt for day of the week.

Step 4: Converting transaction type.
In the input data, your transaction types indicating whether a transaction took place in person or online are values. But in the output, they want these written clearly so that you don't have to try to work out whether 1 is in person or online. You could simply hard code these values by writing the names into the profile pane but this is not good practice. Instead, we're going to use an IF statement. Add a new clean step before copying out the calculation below.

Step 5: Aggregate.
To get the transaction values for each bank, day of the week and transaction type rather than each transaction specifically, we need to summarise the data.
Add an aggregation step to your workflow. Drag your bank, day of week and transaction type fields to group by and add your transaction value to the aggregate field, ensuring the aggregation type is set to sum.
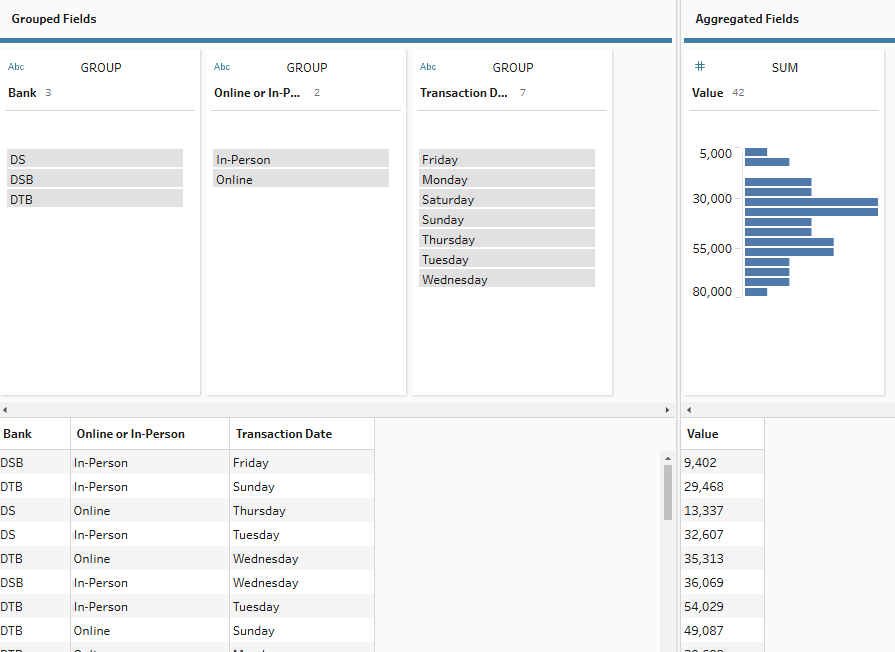
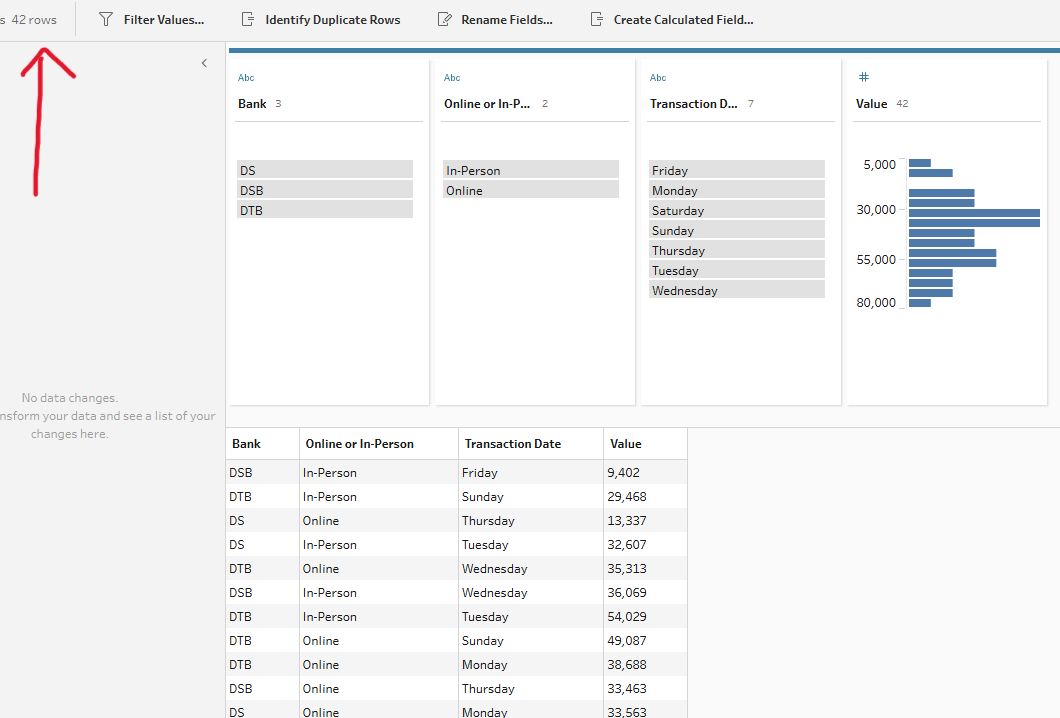
And that was the final step. Check your output has the 42 rows of data expected and that the rows are showing the correct values (I tend to just check a couple to make sure nothing is way off). Then save your output and workflow!

Not too complicated in Tableau Prep, as expected for the first week of the year, but several fundamental steps learned. Let's see how these steps translate into Alteryx.
Alteryx
In my opinion, Alteryx is very similar to Tableau Prep in a lot of ways which is why I thought it would be the best software to attempt second. In my view, it's kind of like the same product in different packaging but that's probably a controversial opinion so I won't say that one too loudly! What I mean though is that if you managed to do something relatively simply in Tableau Prep, it will also likely be relatively simple in Alteryx in my experience.
Step 1: Load in your data and browse.
Like in Tableau Prep, we've got to input the data into the workspace and let's add a browse tool so that we can see what we're working with.
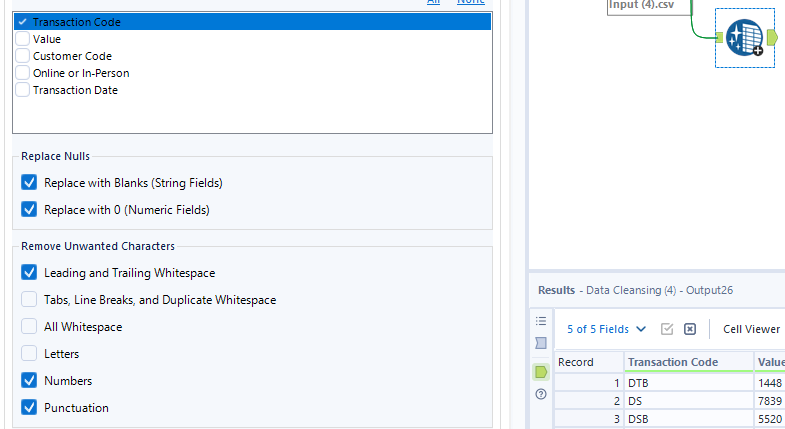
Step 2: Convert the transaction code.
Just like in Tableau Prep, we can either split the transaction code off or perform a data clean. I think in this case that the data cleaning is actually more efficient but let's look at both options.
For the data cleaning option, add a cleansing tool to the workflow and select the transaction code column. You then want to make sure that the numbers and punctuation columns are selected in the 'remove unwanted characters' section.
For the splitting option, you need to add a text-to-columns tool from the parse tab. Then, set up the tool as below.
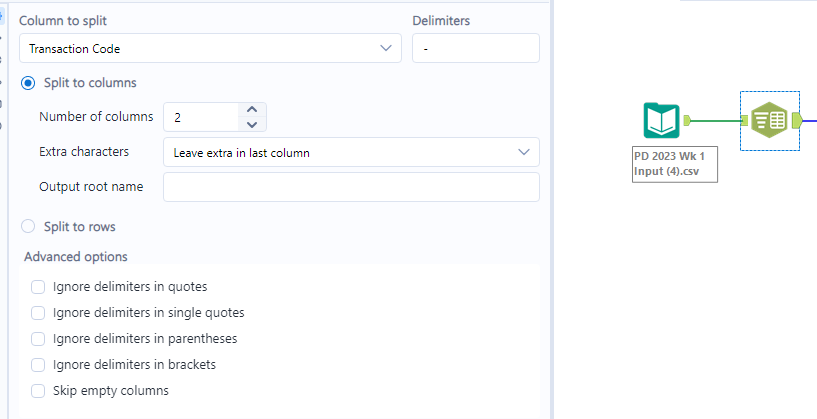
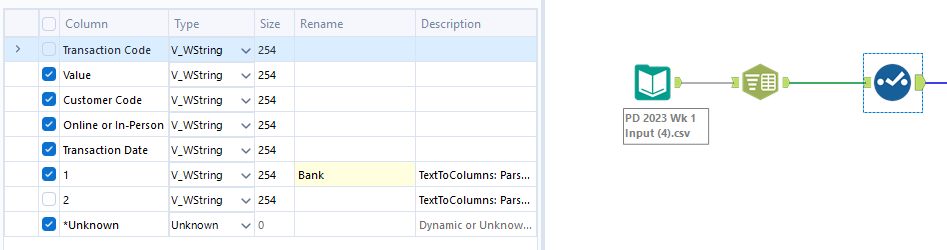
This will generate two new columns - one with the bank information that we want and another with the excess information. You need a select tool to get rid of the unnecessary columns and rename our chosen column.
Step 3: Convert date to day of week.
Unlike in Tableau Prep, there isn't a quick button that you can press to magically convert the date into the day of the week sadly. Instead we have to convert the date into date format first of all by using a DateTime tool, specifying the format that the string data is in.
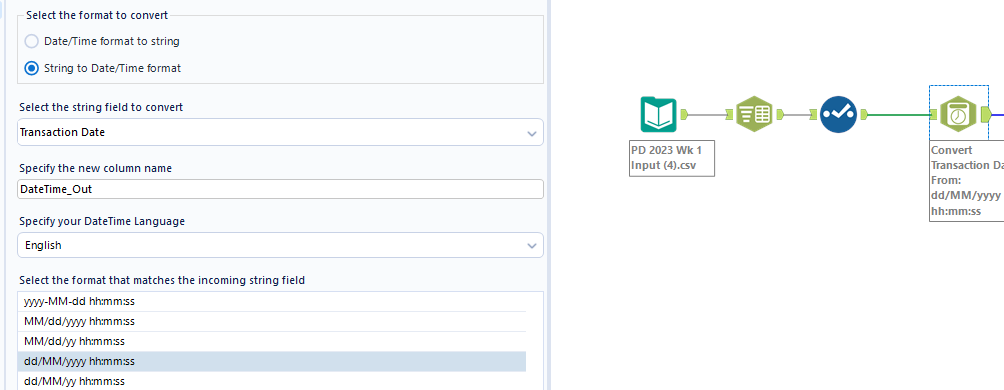
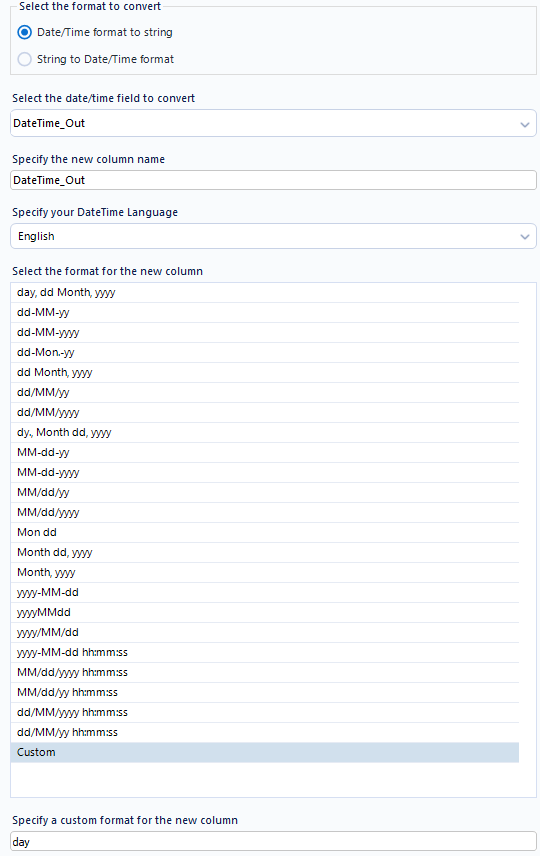
Now that Alteryx understands this is a date, it can then be converted into a day by essentially turning it back into a string again using another DateTime tool, again specifying the format you'd like the string to be in.
A new select tool is now needed to clean up our output.

Step 4: Converting transaction type.
Like in Tableau Prep, we need an IF statement to convert the transaction type from a value to text. This uses a formula tool set up in the format below. I used single quotes for the 1 and 2 values because the data type is a string rather than a whole number like it was in Tableau Prep.

Step 5: Aggregate.
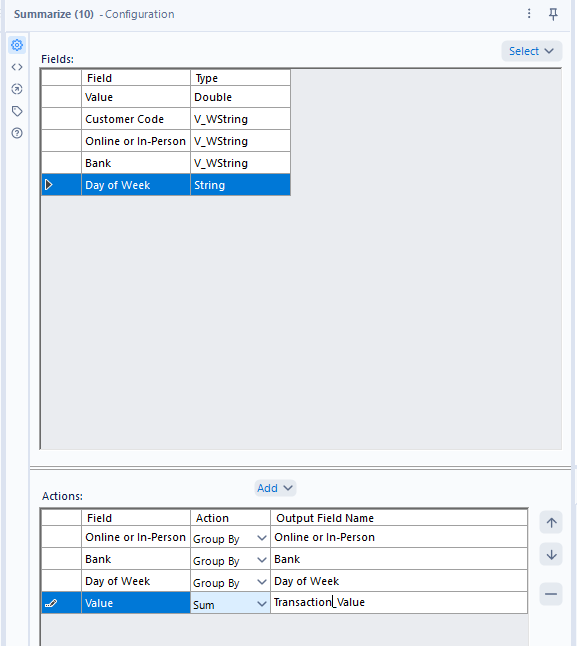
To aggregate in Alteryx, we use a summarise tool. Drag this into the workflow and set up the configuration pane as below. If it's saying that you can't sum your 'value' field then you likely have it set up as a string because when everything is loaded into Alteryx from a csv, fields are automatically set as string data types. You can change this using one of our earlier select tools.
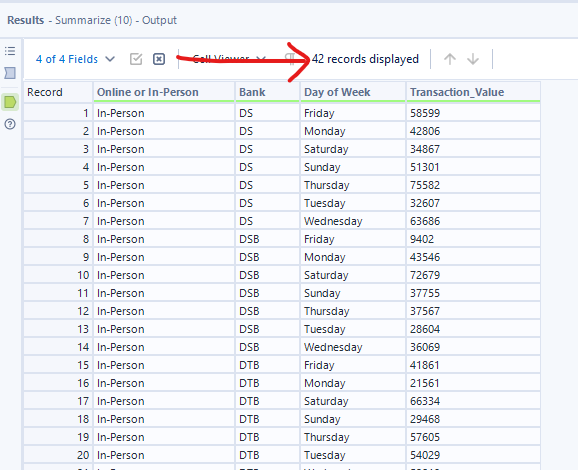
Check you have the correct number of record before adding an output data tool and saving your workflow.
Power Query
From my experience in Power Query, there are things that are definitely simpler to complete but also steps that are harder to complete compared to Alteryx and Tableau Prep. Let's see if that rings true today!
Step 1: Load in the data.
This is a pretty simple, self-explanatory step. We don't need to add anything to view the data because that's the default option anyway.
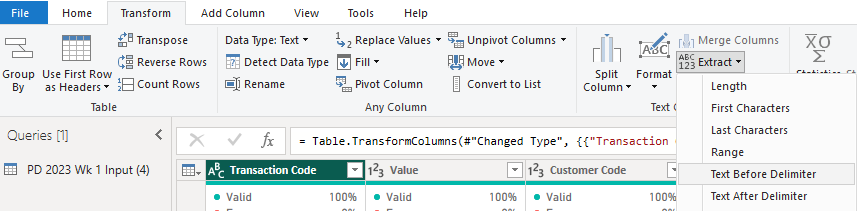
Step 2: Convert the transaction code.
To get our bank specific code, there are again two options but this time, there is no cleaning option. There is the splitting option as usual, achieved by right clicking the column header > Split Column and choosing By Delimiter. Then delete the column with the excess information.
There is also an extract option which I think is the best option we've had so far. All we have to do is go to the Transform tab > Extract > Text before Delimiter. That leaves no excess information to remove, just the need to rename the column to bank by double clicking the column header.
Step 3: Convert date to day of week.
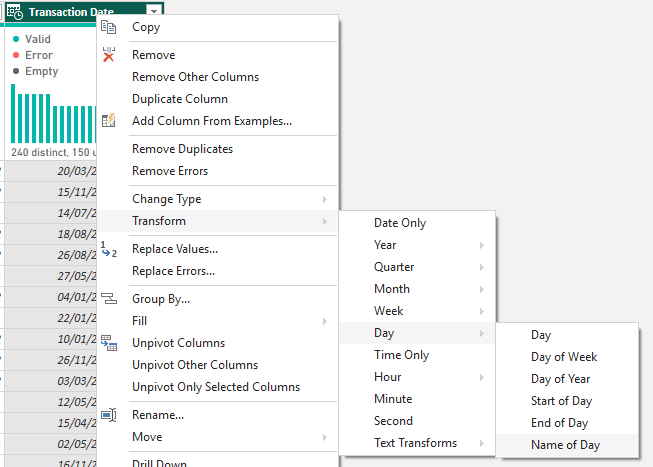
Once again, we're back to the land of simplicity thankfully when converting date to day of week. We can use the click of a few buttons as our transaction date has automatically loaded in date format. Simply right click the transaction date header > Transform > Day > Name of Day.
Step 4: Converting transaction type.
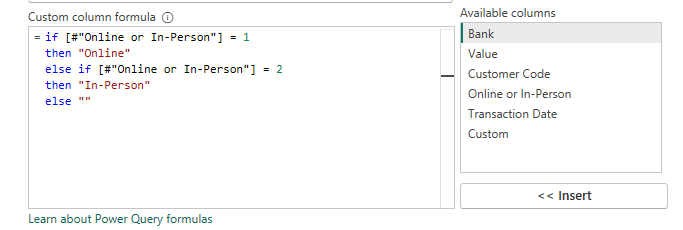
There are two ways to go about converting the transaction type properly. The first uses a custom column where you set up an IF statement like we did in the other two platforms. Go to the transform tab > Custom column before writing your calculation as I have below.
A couple of sensitivity issues that tripped me up when I first went to create this calculation were:
- Your keywords (if, else etc.) need to be in lowercase.
- Your strings must be encased in double quotes.
- The IF statement ends with an else, not an end.
That's just because I'm a little less familiar with Power Query and M code (the language that Power Query is written in) but with more experience, it's as simple as creating an IF statement in Tableau Prep using END or Alteryx using ENDIF.
Instead of using a custom column, you could also have used a conditional column which is a little easier honestly. It has the IF statement set out in layman's terms and all you have to do is fill in the blanks like I've done below!
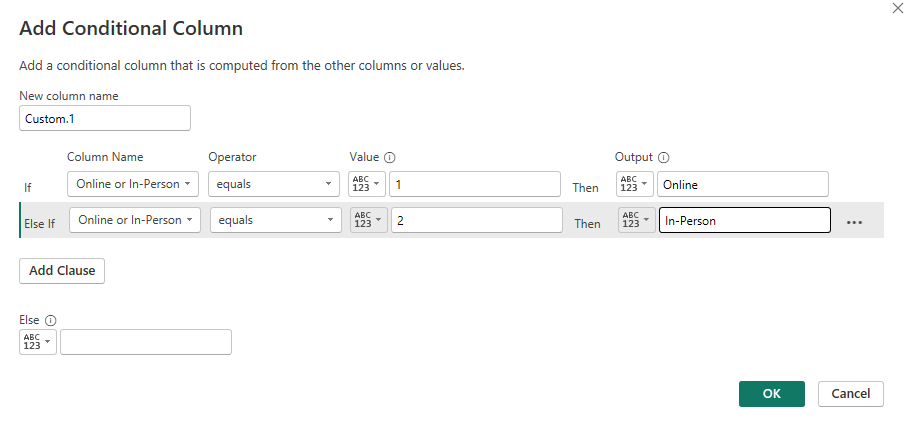
The only thing to note in this overall step is that you can't overwrite the original column, you have to create a new column and delete the original (or wait until the next step where the original column will get deleted by the group by anyway).
Step 5: Aggregate.
To aggregate the output, you need to go to the Transform tab again but this time, select Group By. A pop-up window like the one below will appear and you should fill it out as I have done.
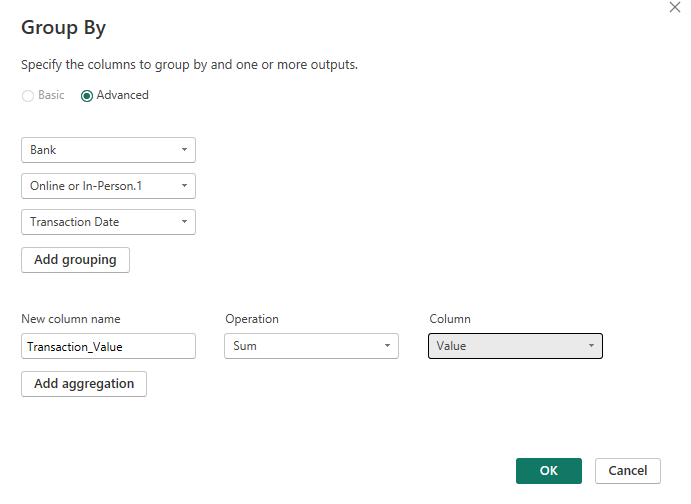
With your new aggregation, you might need to finish off renaming some of your columns like I did and check that you've got your 42 rows (in the bottom left of the screen).
And that's how you complete a data prep challenge on three different platforms! Maybe it's just me but I feel like I learn so much more by completing challenges in this way and it's a fantastic opportunity to see how the platforms vary on a step by step basis. If you're interested in a breakdown of step specific differences like aggregation and ranking, I've actually started a series of blogs on just that. You can find my 'Back to Basics' blogs collated on my profile for those comparisons between the data preparation platforms and more. In the meantime, I hope you also feel like you've learnt something today, even if it was just that practising data preparation challenges across multiple platforms can be incredibly beneficial. Until next time, happy prepping!