


In the previous blog, I shared about the data engineering lifecycle from the raw data source to the endpoint. If you haven't read it, feel free to check it here. If you look at the diagram in that blog, in the undercurrent part, there's an orchestration process.
So what is the Orchestration?
According to the book Fundamentals of Data Engineering by Joe Reis and Matt Hously, Orchestration is "the process of coordinating many jobs to run as quickly and efficiently as possible on a scheduled cadence".
The orchestration system can help users to monitor how the jobs run anytime they are deployed automatically. After running the job, the user can track the history of the running times. In this blog, I'm going to share how to create a job to run the Python script automatically on the local machine and also on GitHub.
Before going to the next section, make sure that you already installed Python with a Text Editor (I use VS Code in this blog), and registered a GitHub account.
Let's get started!
Prepare the Python Script
First, I will install the virtual environment in my project folder. I created a project folder called "Orchestration_sample", then change your directory in the terminal to access that folder. After that, I installed the virtual environment to run the script in the terminal:

On MacOS, you might run python3 -m venv .venv
Now, we can activate the virtual environment (.venv) on the terminal. On Windows, you can run:

On MacOS, you can run: source .venv/bin/activate
After you activate the virtual environment, the name of your virtual environment (.venv) will show at the front of the directory like this:

To deactivate the virtual environment, you only need to type deactivate and press Enter.
Now, I created a new Python file called "logging_example.py" inside the Orchestration_sample folder.
import logging
import os
from datetime import datetime

def main():

    #Create a logs folder in the directory if it doesn't exist
    os.makedirs('logs', exist_ok=True)

    #Create a log file with a current timestamp, so can track the logs after running the script
    timestamp = datetime.now().strftime('%Y-%m-%d_%H-%M-%S')
    log_filename = f"logs/log_{timestamp}.log"

    #Configure logging to write to the log file
    logging.basicConfig(
            level=logging.INFO,
            format="%(asctime)s [%(levelname)s] %(message)s",
            filename=log_filename
        )
    #Create a logger instance
    logger = logging.getLogger()

    #Log the message
    logger.info("Starting the application...")
    print("Hello, World!")
    logger.info("Finished executing the application.")

if __name__ == "__main__":
    main()
That script helps to create a logs folder in the directory if it doesn't exist. Then, it will create a log and log message into the .log file (file name is the current timestamp).
After pasting that script into the logging_example.py file, you can try running it by typing in the terminal (where you already activated the virtual environment):
python logging_examply.py (or python3 logging_examply.py on MacOS)
You will see the "Hello, World!" message printing out of the screen in the terminal.

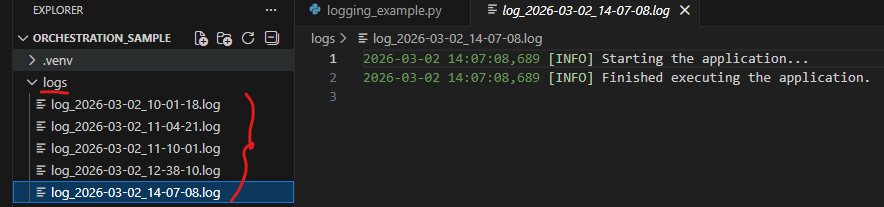
In the Orchestration_sample folder, you will see that it created a logs folder. Inside that logs folder, it creates a .log file with the file name in the format <logs_timestamp>.log
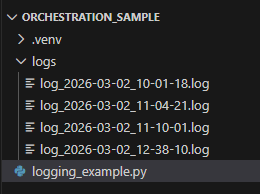
Inside the log file, you can see that it shows the timestamp and the Info message that we set in the Python script.

Cool! Now the Python scripts. Let's create a job to make it run automatically.
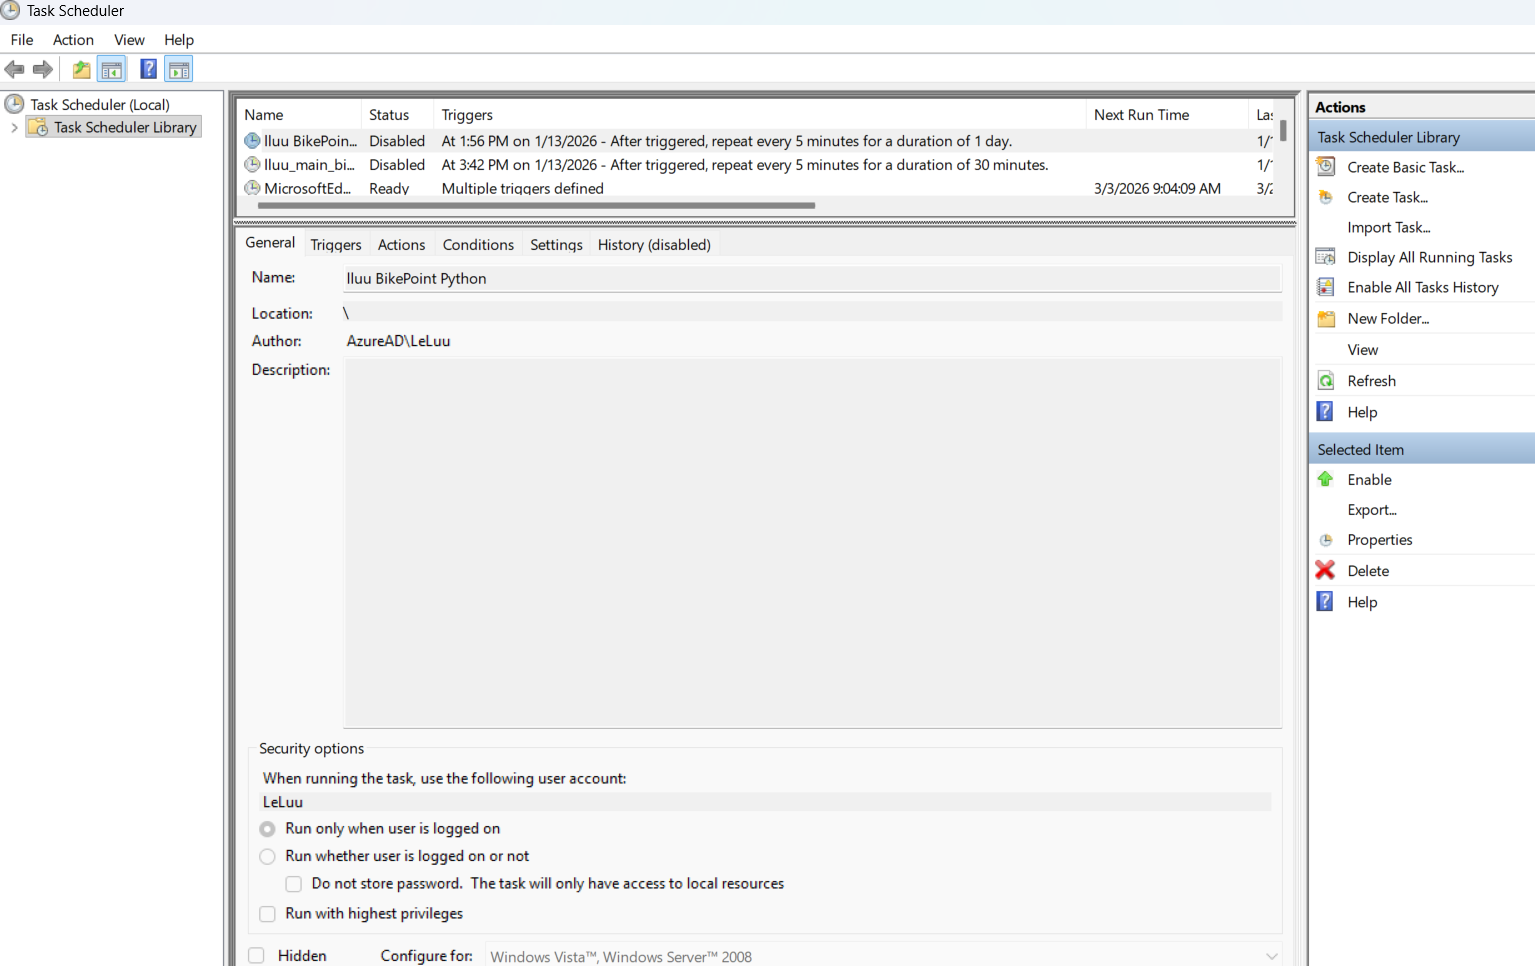
Task Scheduler on Windows
You can create a task to run the Python script on Windows automatically with Task Scheduler on the local computer.
The interface of the Task Scheduler looks like this:
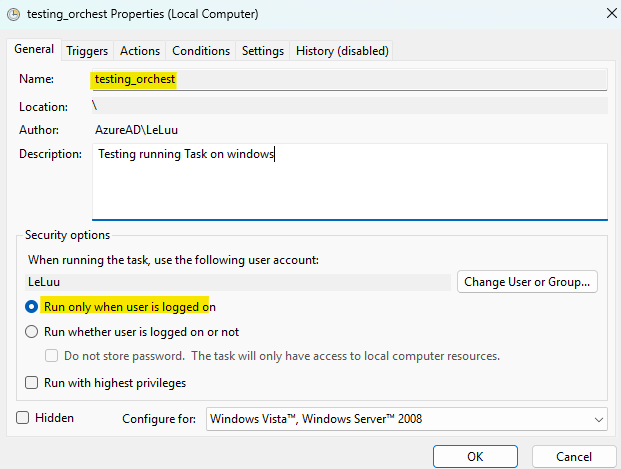
On the right panel (Actions), click on the Create Task menu. On the General tab, type the name of the task (For example: I type testing_orchest). For security options, I choose Run only when user is logged on. You can also choose the option "Run whether user is logged on or not".
Next, click on the Triggers tab, which is next to the General tab. Then, click on the New button at the bottom.
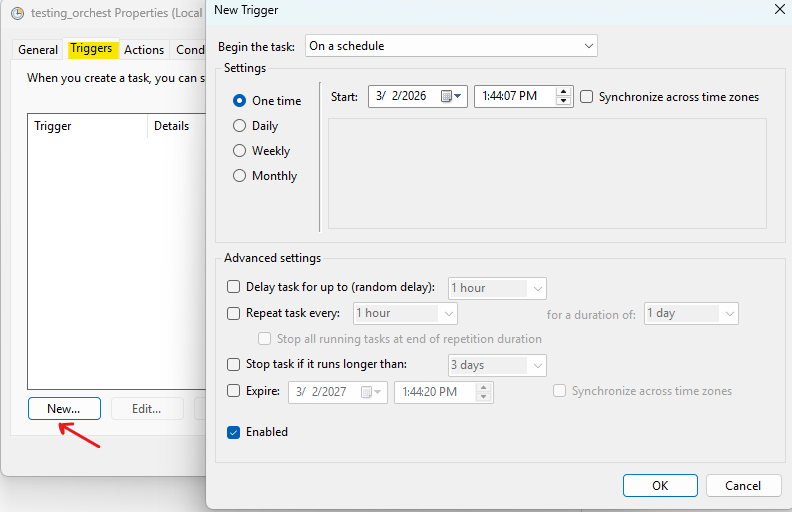
A window of New Trigger appears; there are many options to choose from the "Begin the task" dropdown menu. I choose on a schedule because I want to set a specific time to run the Python script.
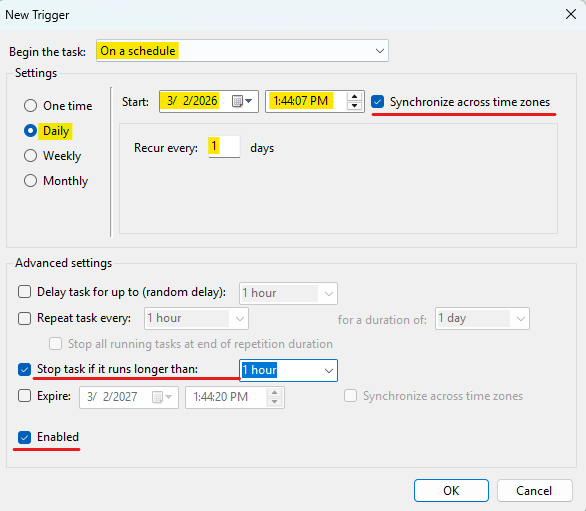
Here, I set Daily, which runs every day (Recur every: 1 days). You can set the Start date and time to run. The checkbox "Synchronize across time zone" is helpful if you are traveling in a different time zone and you want to synchronize this task to match the time at your current place.
Any errors could happen if the task runs longer than 1 hour. So, I checked the box "Stop task if it runs longer than: 1 hour". Finally, check the box "Enabled" to enable this task to run. You can uncheck this box if you don't want this task to run anymore.
Next, I click on the next tab (Actions). In this Actions tab, we want to set the action we want (it can run the program or send an email).
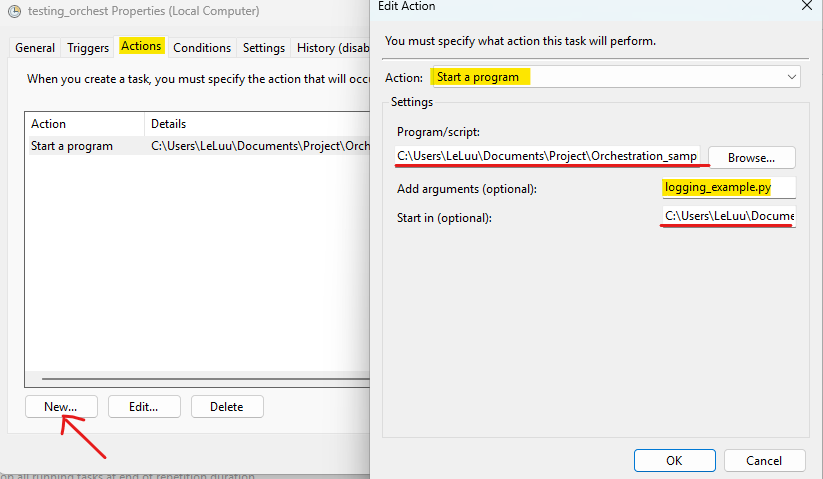
I click on the New button. Then, an Edit Action appears. I choose Start a program in the Action dropdown menu.
In the Program/ script: you need to specify which program you want to run. For example, here we are running the Python script. So I need to find the python.exe to run the script.
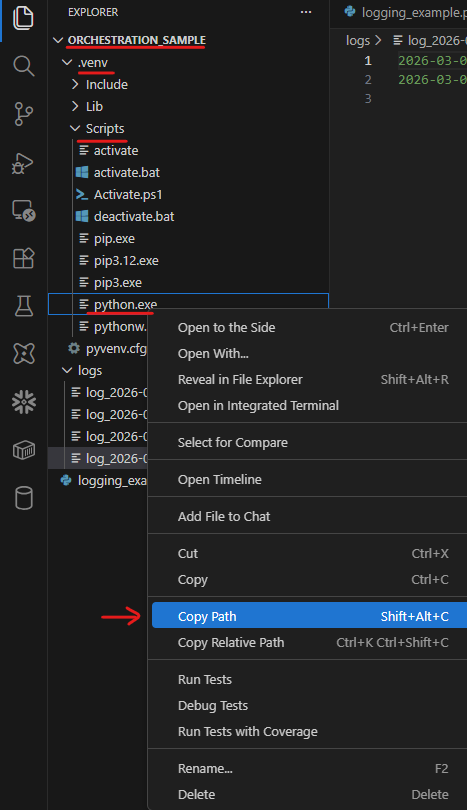
We already installed the virtual environment from the beginning, so the Python.exe file existed in C:\...\Orchestration_sample\.venv\Scripts\python.exe. You can right-click on the python.exe file and choose Copy Path. Then, paste it into the Program/script box (Fig. 11).
In the Add Arguments (optionals) box (Fig. 11), I type the name of the Python file. My Python file name is logging_example.py. In the Start in (optional) box, I copy and paste the Orchestration_example folder path to that place.
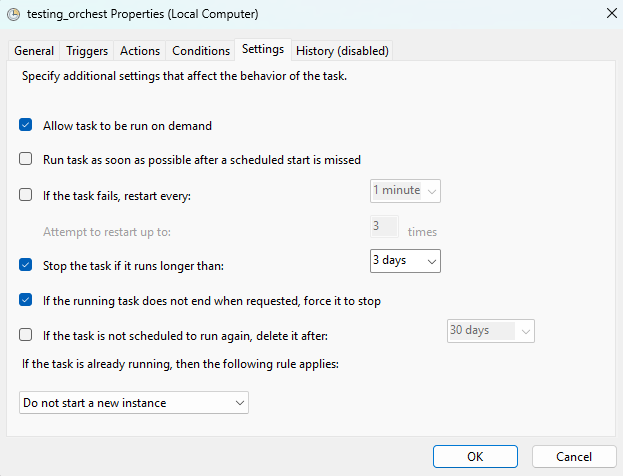
There are many settings to configure if you want in the Conditions and Settings tabs.
Then, click on OK. Go back to the Triggers tab to set the time closed to your current time and wait for the local computer to run the task.
If it's successfully run, you will see a new log added inside the logs folder.
In the Task Scheduler window, you can also check the last run, the next run, the status of the last run as well.

GitHub Actions
According to the GitHub documentation page, GitHub Actions is a continuous integration and continuous delivery (CI/CD) platform. You can automatically build and run the test in the pipeline on every pull request to your repository. You can check more at this documentation page.
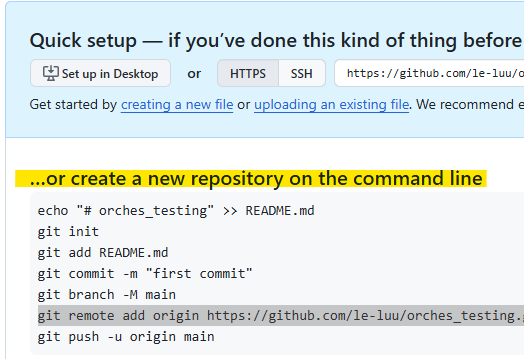
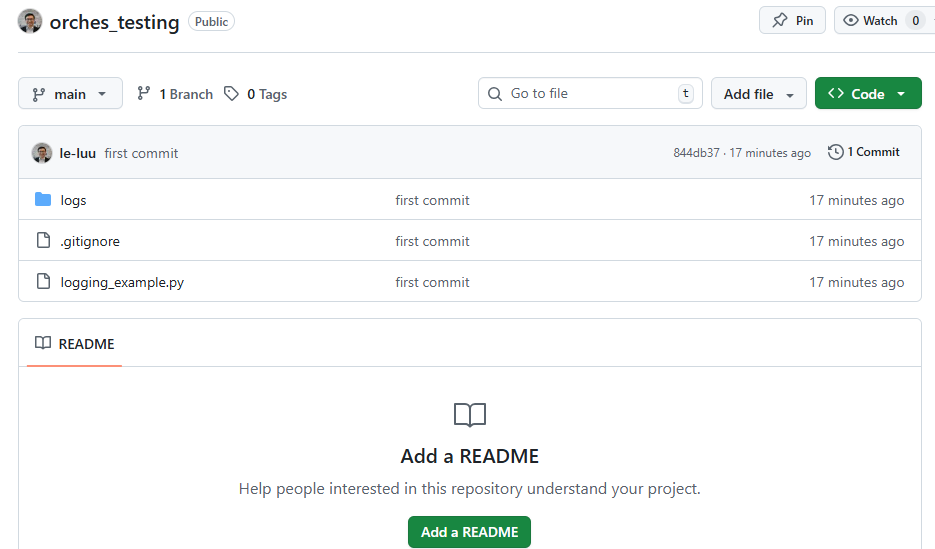
First, you need to create a new Repository on GitHub from your GitHub account. After you create a new Repo on GitHub, it will show a page like this:
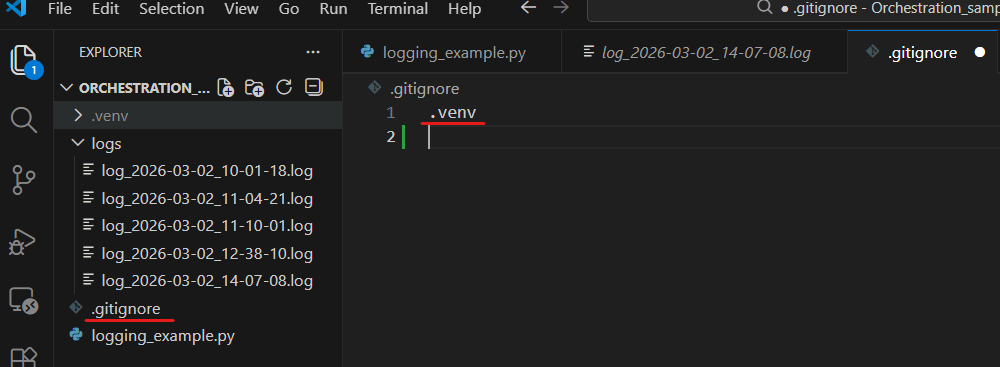
In VS Code, we already created a folder Ochestration_sample, now we want to publish those files into a remote branch on GitHub. You can create a new file called .gitignore in the Orchestration_sample folder. This file will ignore files/folders that you don't want to publish on the remote branch.
For example, I don't want to commit the .venv folder on the remote branch, in the .gitignore file, I will do:
Then, I follow the instruction steps on the GitHub page (Fig. 16). First, I will initialize git on my directory with git init command. Then, add all files into staging with git add . command. Commit with the message after adding staging files with git commit -m "<message>". Then, rename the main branch with git branch -M main and connect the local repo with the remote repo at https://github.com/<user_name>/...git
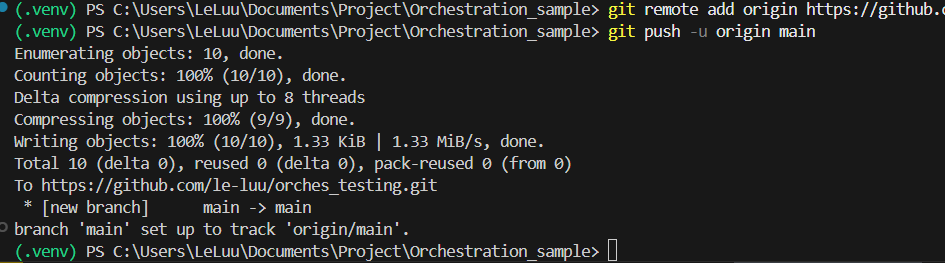
Then, push the local branch to github. After running those commands in terminal, you will see the result in the terminal like this:
Now, check the repo on your GitHub page. All files were there except the .venv folder (Fig. 19).
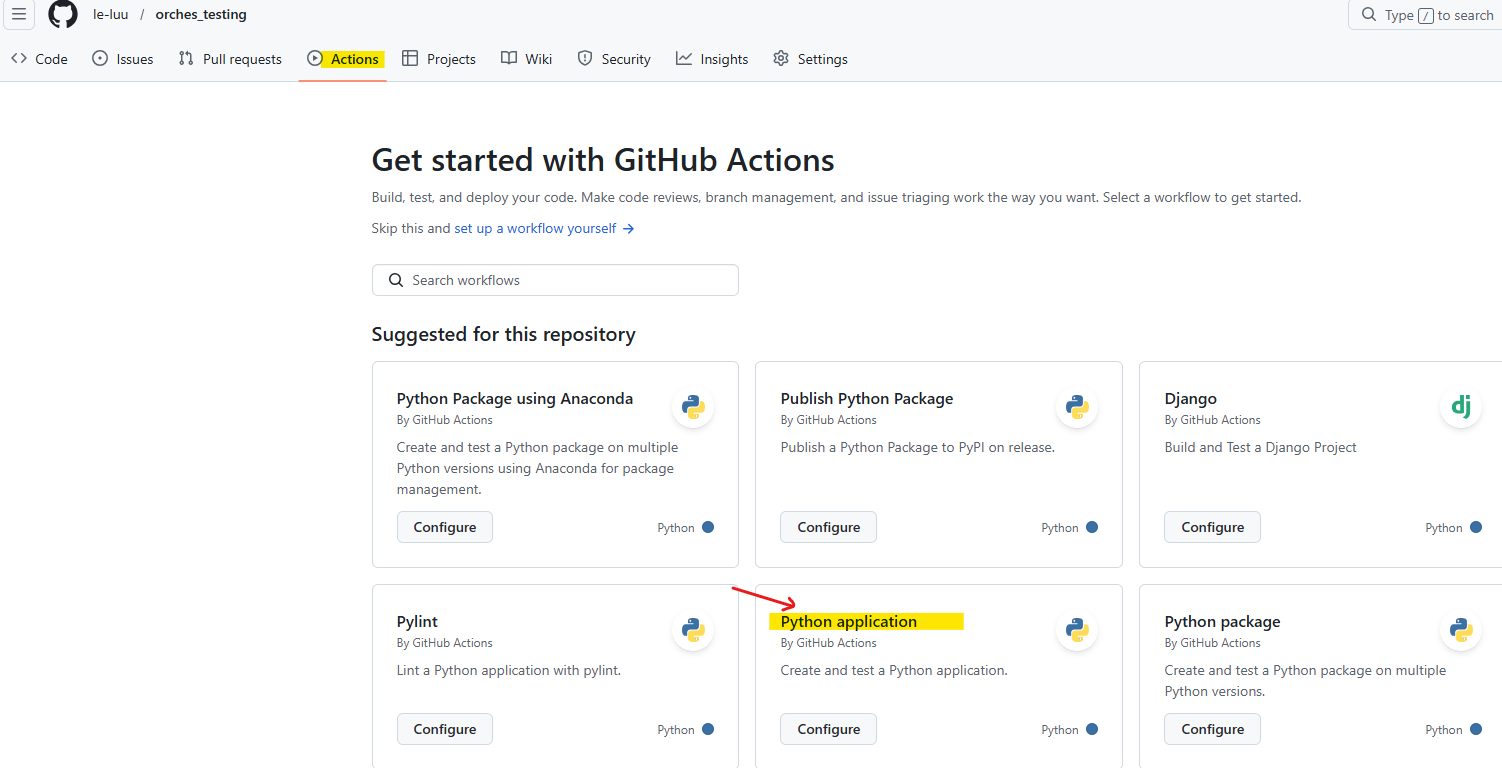
Cool! All files from my local machine were there. Now, I want to schedule a task to run it on this main branch. On the same repo page, at the top, you will see the Actions tab. Click on the Actions tab and choose Python application by clicking on Configure button.
Then, you will see GitHub action creates a yaml files (.yml) for you called python-app.yml in .github/workflows/python-app.yml. We will use this YAML file to set up the trigger to run the Python script.
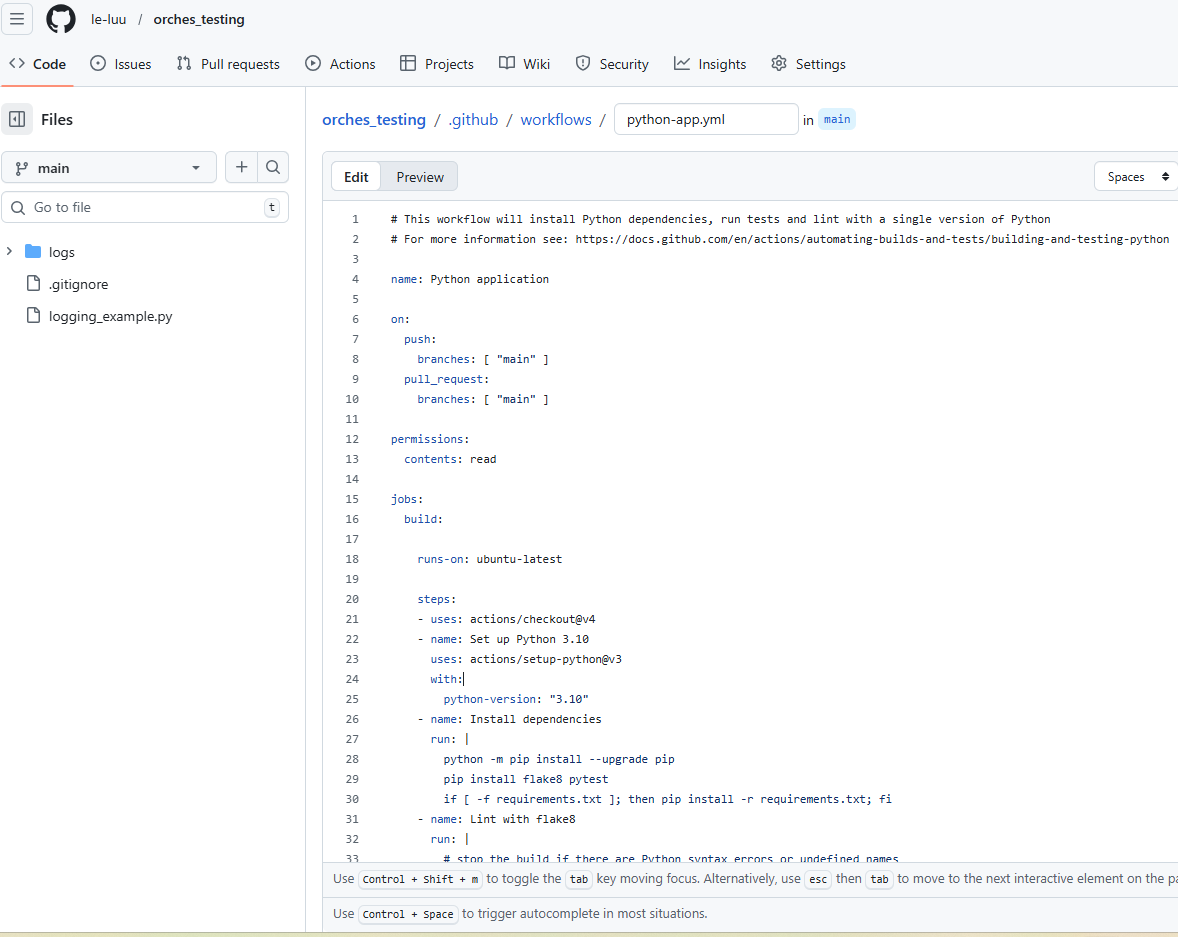
You can check the syntax and the definition of each property in that YAML file in the documentation here. Note that indentation in the YAML file is very important; it could show an error if there's an additional space/ tab at the front.
Let's start with the name. You can set any name for the workflow there. By default, it put Python application there. So I changed it to Orchestration Testing.
Inside the on, I will set the date and time in the week I want to run the Python script. So I use the schedule property, which you can check in the documentation page that I linked above. Note that the schedule follows the POSIX cron syntax (Fig. 22).
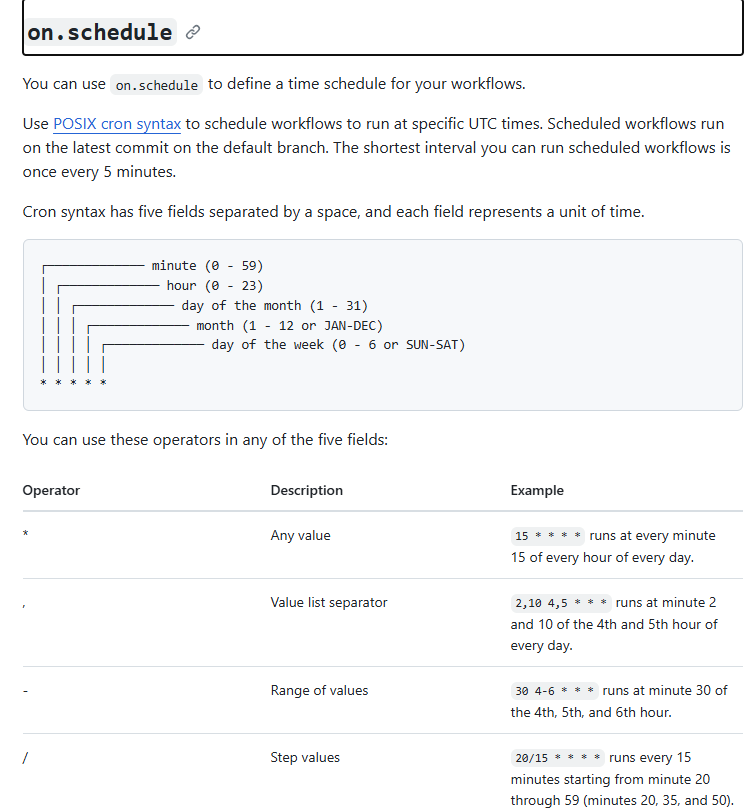
There are a total of 5 characters. The first character from the left is minute, then hour, day of the month, month, and day of the week.
For example, if I want to run the Python script at 2:00 PM every day of the week. I will type: 0 14 * * * . It means it will run at exactly 14:00 every day in the week. Now, if I want to set running at 2:00 PM every Monday, Wednesday, Friday of the week. I will type: 0 14 * * 1,3,5
- The first character on the most left (0) is the minute.
- The second one is 14, that is the hour in the day from 0-23. As I want 2 PM, so I put 14.
- The next character is *, which is the day of the month. I set it to any day.
- The next character is another *, which is the month. I also set it to any month.
- The last character includes 1,3,5, which are Monday, Wednesday, Friday (0 references to Sunday until 6 references to Saturday).
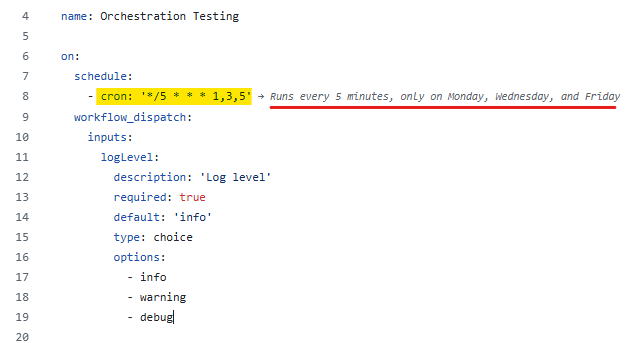
From there, you can also set the Log, so it will store the log to track how it runs. Same as in the Python script, I want to log the message when it starts running and after execution.
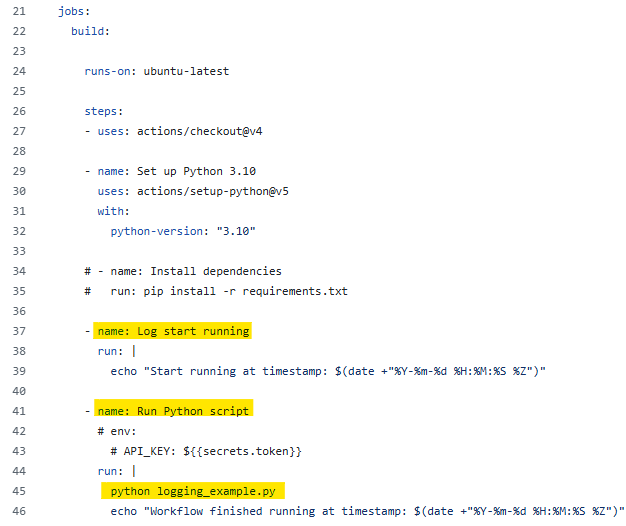
I created a new job for logging to start running and Run Python Script. I didn't install any Python packages to run the Python script, so I don't have the requirements.txt. You can also skip that. I also didn't use the environment to store the key value. In case you need to use it, just add the env with the key or token. On GitHub, go to Settings > Secrets and Variables > Actions. You can add the key/ variables there.
In the job run Python script, I run the command python logging_example.py (same as we run the Python script in the Text Editor). I also wrote a message to announce that I have finished running. Then, I commit the changes.
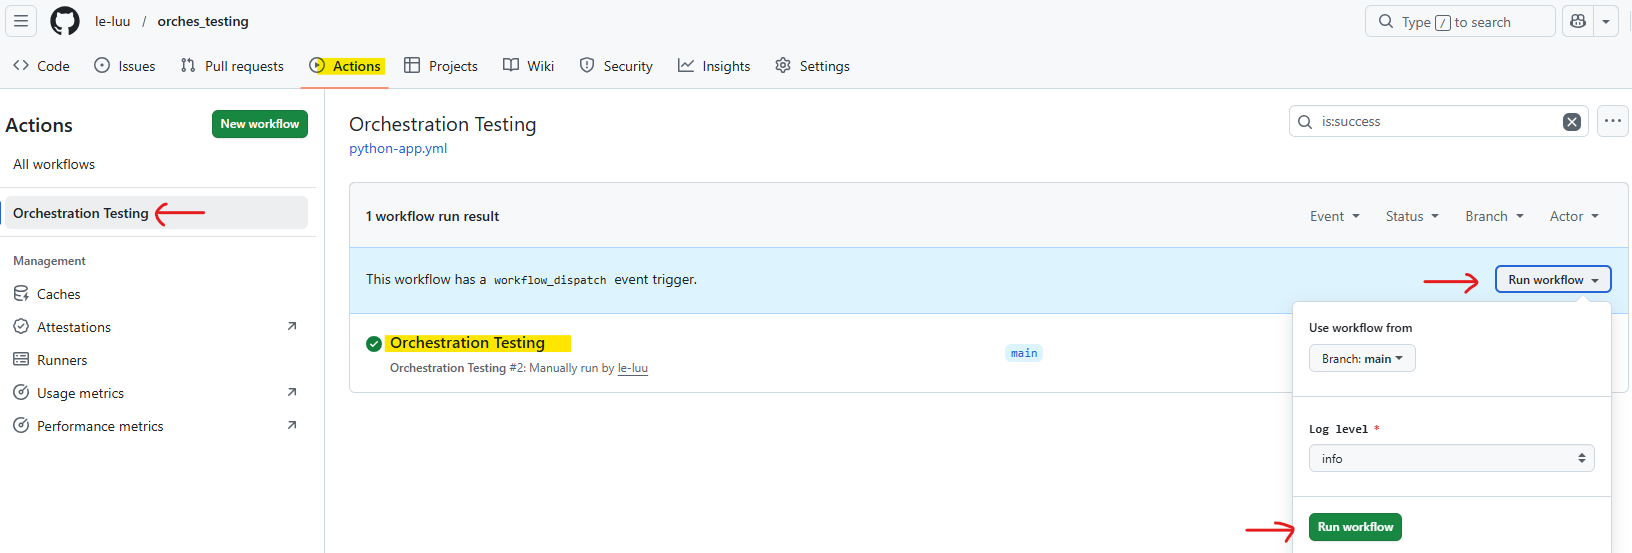
If you don't want to wait for 5 minutes, you can manually run the workflow by clicking on the Actions menu at the top. Then choose the name of the workflow that we set in the YAML file. After that, click on the Run workflow dropdown menu and click on the Run workflow green button. It will run all the jobs.
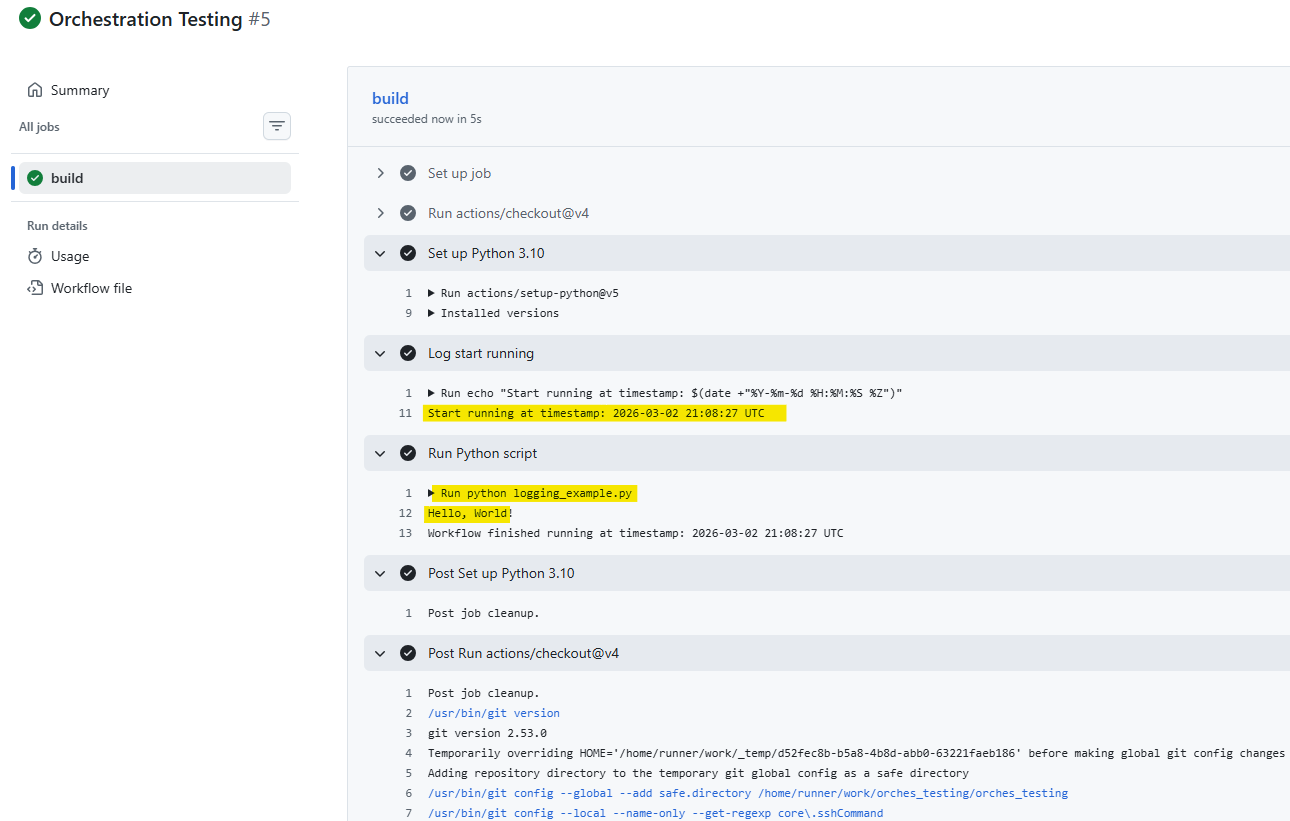
You can check the log after the workflow runs. From Fig. 26, you can see that the Python script was run. It prints "Hello, World!". You can also see that the log with a timestamp shows there.
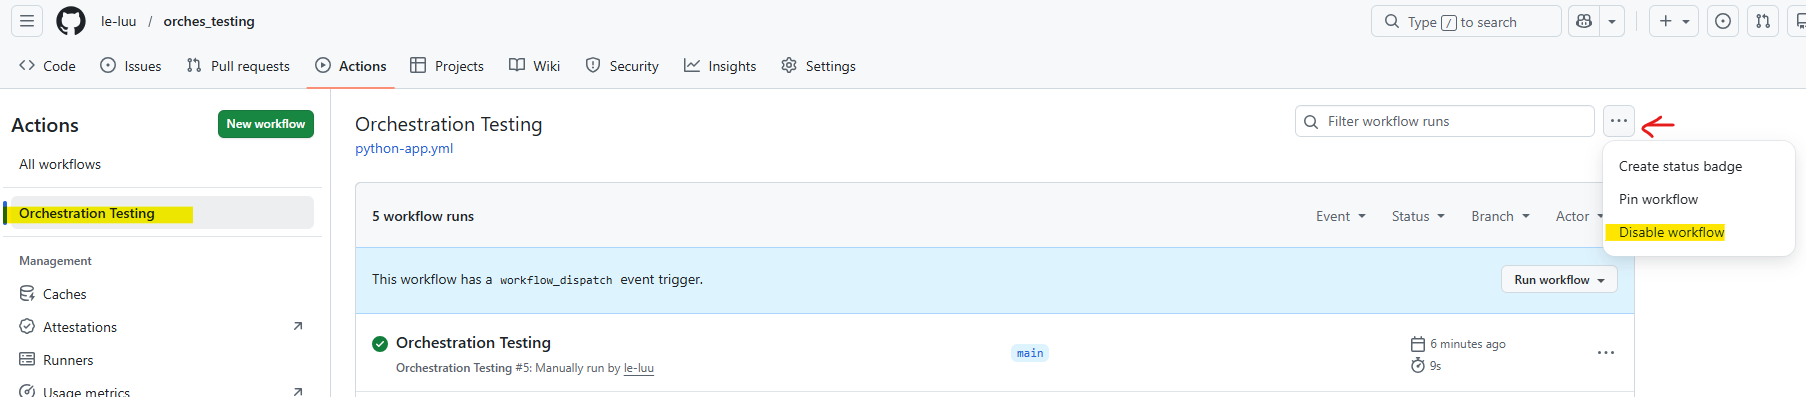
There are many ways to disable the triggers on GitHub action, you can:
- Remove the on.schedule (the cron in the YAML file)
- Or go to Actions > Select the workflow > Click on ... at the top right > Choose Disable workflow
I hope this blog helps you understand how to schedule and automate a Python script to run at specific dates and times. Beyond the technical setup, we also explored what orchestration means and how it plays a critical role in managing tasks within a data pipeline.
Orchestration is more than just scheduling. It is the process of coordinating, monitoring, and controlling workflows so that each step in your pipeline runs in the correct order and at the right time. If you are thinking about CI/CD or production-grade data pipelines, orchestration becomes an essential component rather than an optional one.
In this blog, I introduced two practical ways to set up triggers (Task Scheduler and GitHub Actions). There are many other powerful orchestration tools available, depending on your needs, such as: Apache Airflow, Kestra, AWS ...
As your projects grow in complexity, exploring these tools can help you build scalable, reliable, and production-ready pipelines.
See you soon in another blog!