


In the world of data preparation, we often transform data tables through a series of steps to put them into the correct shape and format for analysis and other purposes. Many of these transformation processes are applicable to multiple tables within a single project.
Instead of rewriting the same code for each table, we can leverage dbt packages that contain useful macros to simplify the process. The most popular of these is the dbt_utils package, which includes a wide range of common transformations.
For more information dbt docs.
In this blog post, we'll explore two of the most powerful macros from this package: pivot and unpivot. These are data transformations used to change the shape of your tables.
dbt_utils.pivot
The pivot macro transforms a table by turning unique row values from a single column into new columns. This makes the table wider and shorter, and it typically requires an aggregation to summarise the data from the original rows.
The two most important arguments you need to specify are:
column: The name of the column in your source table that contains the values you want to turn into new column names.
values: A list of specific values from the column argument that you want to pivot into their own columns. The macro will create a new column for each value in this list.
While the pivot operation often involves an aggregation, the agg function is an optional argument in the macro, and it's set to sum by default. You can change this to count, max, avg, or any other aggregation function you need. Other optional arguments include alias, prefix, and suffix to customise the names of the new columns.
Example:
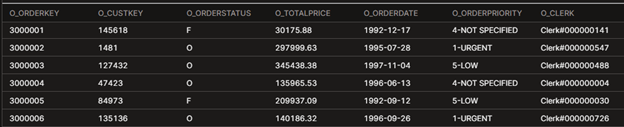
The following example uses the orders table from Snowflake’s sample dataset: snowflake_sample_data.tpch_sf1.orders. This table contains information about orders that customers have placed, including fields such as o_custkey, o_orderdate, o_orderpriority, o_totalprice, and o_orderkey.
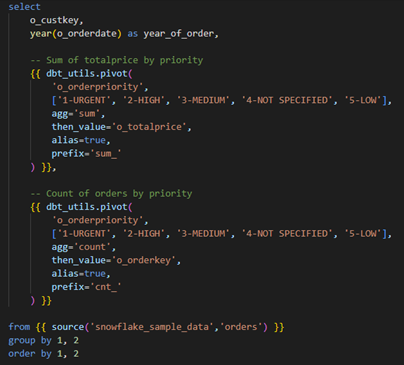
Suppose you want to break out both total revenue and order counts for each order priority (1-URGENT, 2-HIGH, 3-MEDIUM, 4-NOT SPECIFIED, 5-LOW) into their own columns.
We can do this with two calls to the dbt_utils.pivot macro:
- Revenue totals – use agg='sum' and then_value='o_totalprice'. This creates columns like sum_1_URGENT, sum_2_HIGH, etc., each showing the total revenue for that priority.
- Order counts – use agg='count' and then_value='o_orderkey'. This creates columns such as cnt_1_URGENT, cnt_2_HIGH, etc., each showing the number of orders that fall into that priority.
Both pivots run inside the same SELECT statement, grouped by customer and order year.
Other Optional Key Parameters Explained:
then_value → The column being aggregated inside the CASE.
Think of it like: “If the row matches this value, use this column here.”
For revenue totals: then_value='o_totalprice'.
For order counts: then_value='o_orderkey'.
alias → Whether or not to include a suffix in the output column names.
alias=true will make your output columns more readable, e.g., sum_1_URGENT instead of just 1_URGENT.
prefix → An optional string that gets added at the start of each column name. Helps distinguish between multiple pivots in the same query.
prefix='sum_' → columns like sum_1_URGENT, sum_2_HIGH.
prefix='cnt_' → columns like cnt_1_URGENT, cnt_2_HIGH.

After pivoting, you end up with a table where each row represents a customer and the year they placed an order, along with the total revenue and the order count broken down by each priority level.
If you would like to read more about how this macro was originally created, visit the GitHub page using this link.
dbt_utils.unpivot
The unpivot macro performs the reverse operation. It converts multiple columns into new rows. This makes the table longer and narrower, and it generally doesn't require aggregation as it simply restructures the data without summarising it. This macro is slightly more complex than the pivot macro and requires additional arguments to specify how the unpivoting should be performed.
relation: This is a required argument that specifies the source table or model you want to unpivot. You'll typically reference your table using ref('your_model_name').
cast_to: This argument is necessary to tell dbt what data type the new "value" column should be. The unpivot operation combines data from multiple columns, which may have different data types, into a single column. You must specify a target data type, such as 'varchar', 'float', or 'int', so that all values can be stored in the same column.
column_names: This is a list of the specific columns you want to unpivot (i.e., the columns that will be turned into rows).
key_name: This argument specifies the name for the new "key" column. This column will hold the original column names from your column_names list.
value_name: This argument specifies the name for the new "value" column. This column will hold the values that were originally in the column_names list.
Example:
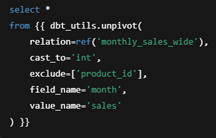
Let's use an example to illustrate how these arguments fit together. Imagine you have a table showing monthly sales, with columns for month_1, month_2, and month_3.

We can do this by calling the dbt_utils.unpivot macro in the from clause and specifying the key arguments. The unpivot macro is called in the FROM clause because it generates an entire derived table consisting of rows and columns, which serves as the dataset for the query. This differs from the pivot macro because pivot returns column expressions that belong in the select statement rather than a standalone table.
Other Optional Key Parameters Explained:
exclude → Columns to keep as identifiers (they won’t be unpivoted). Everything not excluded is treated as a candidate to unpivot.
Exclude=['product_id'] means: keep product_id; unpivot month_1, month_2, month_3. If your table has extra columns that you don’t want unpivoted, add them to the exclude list as well.
cast_to → Data type to cast the unpivoted values to.
Use a numeric type (int, numeric, float) for measures, or varchar for text. We used 'int' because monthly sales are integers.
field_name → The name of the new column that holds the original column names.
Here we chose 'month', so you’ll see values like month_1, month_2, month_3.
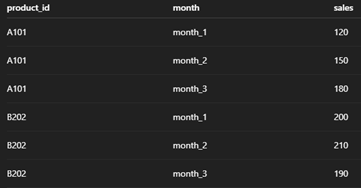
The unpivot macro takes the values from the specified columns (month_1, month_2, month_3) and places them into the new sales_amount column. At the same time, it populates the new month column with the original column names.
If you would like to read more about how this macro was originally created, visit the GitHub page using this link.