


When you're first learning Alteryx, you're likely working with small datasets where performance is not an issue. Often the datasets are so small that you can hardly notice a difference in run time between a workflow with 2 tools and a workflow with 20. Once you graduate to working with real data in workflows that are often lengthy and complex, run times will get much longer and optimization will save you minutes or even hours (instead of seconds or less). With that in mind, I decided to put together as many tips as I could think of to improve the performance of Alteryx workflows, both during development and during production.
Reduce the Amount of Data
The more data you're working with, the slower your workflow will be. There are a few ways to cut down on the amount of data passing through your workflow. All of these should be implemented as early in the workflow as possible.
Drop Unnecessary Fields
Use a Select tool to get rid of any fields you don't need for your workflow. As long as they're in the workflow, they'll be slowing things down. This is especially important when using resource-intensive tools like the Join tool and the Spatial Match tool. There's a good reason they have built-in select functionality. When you use them, you should be dropping anything that you don't need. This is especially important when working with spatial data, which is much more cumbersome to work with than a lot of other types of data.
Filter Out Unnecessary Records
Just as unnecessary fields will slow down your workflow, so will unnecessary records. If you're not planning to use your full dataset, use a Filter tool early on to get rid of unneeded data.
Choose the Smallest Data Type You Can
Different types of data take up different amounts of memory. Bytes and doubles are both numeric data types but doubles take up 8 times more memory (more info on Alteryx data types here). Your workflow will run faster with smaller data types. Alteryx has an Auto Field tool that will automatically convert each selected field to the smallest appropriate data type. Take a look at the screenshots below that contain the metadata of a dataset before and after using the Auto Field tool. You'll see there's a big difference in the sizes of the data types.


When you're changing data types and sizes, just make sure that they're still sufficiently large to hold the data even after changes you make to those fields farther along in your workflow. If the Auto Field tool turns a field into an Int16 but you then multiply that field by 20 later on, you may find that you've reached the maximum size of an Int16 and your data is no longer accurate.
Roll Data Up to a Higher Level of Granularity (if appropriate)
This one is best explained with an example. If you're working with retail data that has a record of every sale a website has made, there could be many millions of records. This can be intimidating to work with but you might only be interested in evaluating performance month-by-month, in which case you could use the Summarize tool to aggregate all of that data to the monthly level. You'd still have all the necessary information but stored in a tiny fraction of the number of records contained in the original dataset. Consider the level of granularity when building your workflow. You might be able to roll up to a higher level of granularity and make your workflow much more efficient.
Configure Your Settings for Peak Performance
There are a few ways to speed up your workflow without touching the tools themselves.
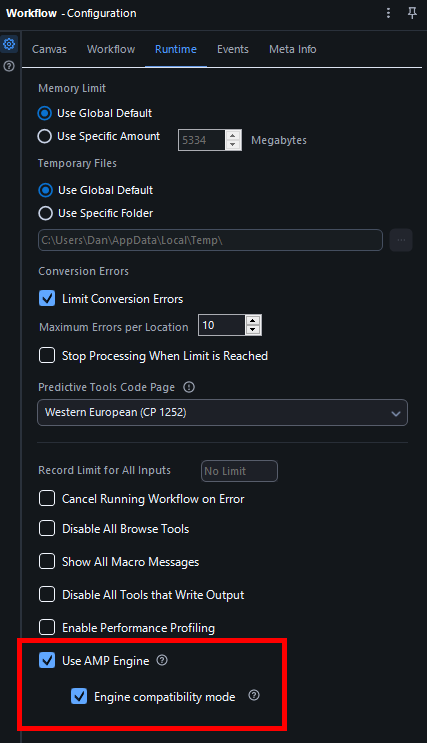
Use the AMP Engine
AMP stands for Alteryx Multi-threaded Processing. The previous engine that Alteryx used before the release of the AMP engine in 2021 processed records sequentially. The AMP engine processes data in parallel, making workflows more efficient.
One drawback of the AMP engine is that it can disrupt the order in which records appear in the Results window. There is a workaround to this, though. If you enable Engine Compatibility Mode, the order in which records are output will be the same or as close to the same as the order from the original engine as possible. Typically workflows are fastest with the AMP engine enabled and Engine Compatibility Mode disabled but if you have both the AMP engine and Engine Compatibility mode enabled, your workflow will still be faster than it would be with the original engine.
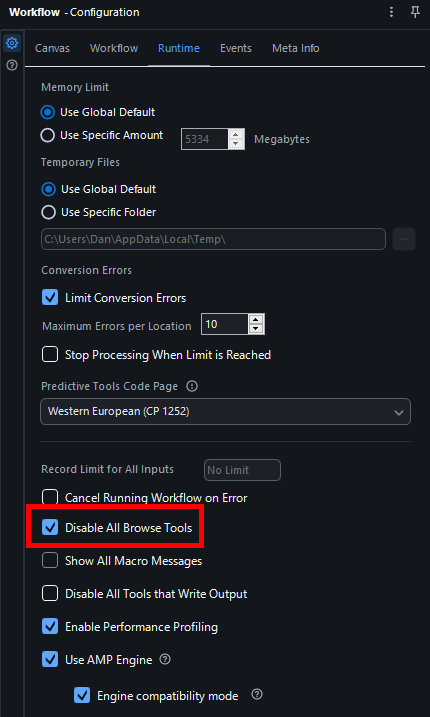
To enable these settings, click on the canvas, then click Runtime in the Configuration window, and check the boxes at the bottom that say Use AMP Engine and Engine Compatibility Mode.
Increase Memory Allocation to Alteryx
This is a tip that should be used sparingly and with caution. By default, Alteryx will use a maximum of 25% of your computer's RAM. This can be changed, though. You can see in the above screenshot that it's possible to change in the Configuration window of the workflow. Alternatively, you could click on Options -> User Settings -> Edit User Settings. Then click the box labeled Override System Settings. You can then increase the amount of your computer's memory allocated to Alteryx.
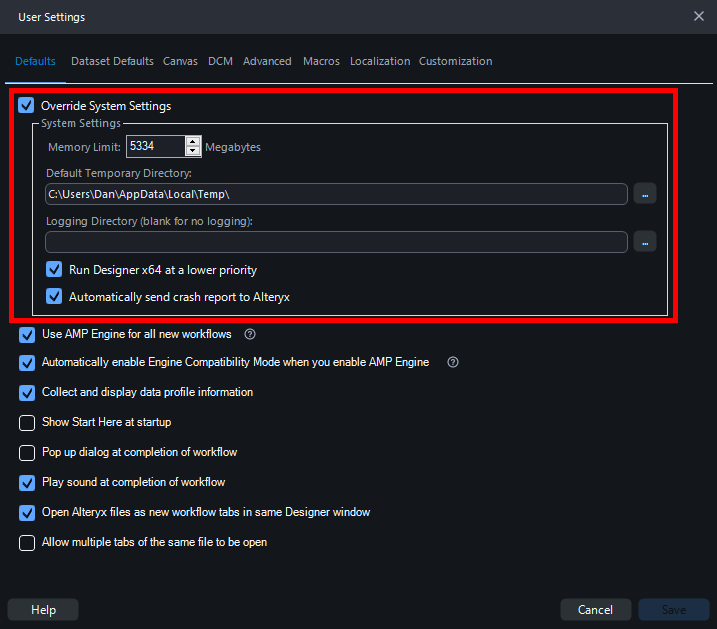
Just make sure not to give too much of your memory to Alteryx or your computer might crash. Alteryx recommends not exceeding 50% of your computer's RAM divided by the number of simultaneous workflows you intend to run.
Use YXDB Files
This isn't really a setting but I think it fits thematically in that it has to do with preparing for a fast workflow before you've even started building it. A YXDB file is an Alteryx database file. It's a file type optimized for use with Alteryx because it structures the data the same way that Alteryx itself does. If you're writing a file that you know you'll be using in Alteryx, it should always be a YXDB. If you want to work with a file of a different type, you could convert it to a YXDB before starting your workflow. Then you could bring that YXDB into Alteryx and build your workflow with that as your input.
Identify Inefficient Tools and Replace them with Efficient Ones
In general, the fewer tools you use, the faster your workflow will run. This isn't a firm rule, though. Some tools are much faster than others. Being able to identify the slowest tools in your workflow can make a big difference.
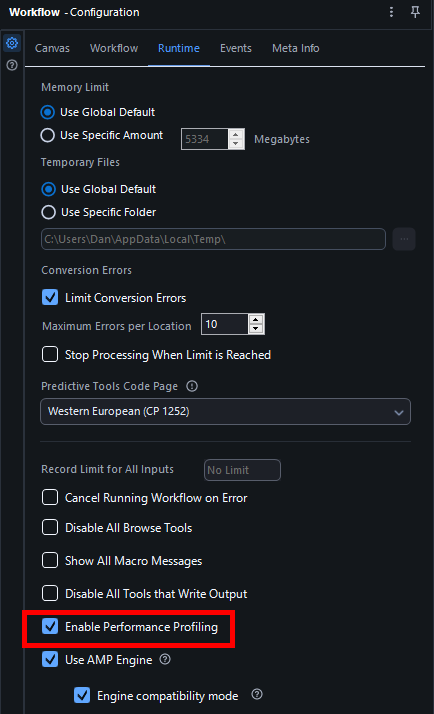
Enable Performance Profiling
When you run a workflow with Performance Profiling enabled, Alteryx will display the time each tool took to run in the messages section of the Results window. Better yet, it will sort the tools from slowest to fastest and tell you each tool's percentage of the total run time. You can use this to identify the slowest tools in your workflow, giving you a good idea of how to start improving it. If you're unsure how to view these messages, just click on the canvas and then look at the Results window. You should see messages that Alteryx generates informing you of what it's doing as it runs a workflow.

As you can see, this whole workflow took 0.9 seconds to run and the tool that took the most time was the Input Data tool.
If you want to view these messages when you're looking at the Results window with a particular tool selected, look in the top left corner of the Results window (or look at the screenshot above). You'll see an icon with three dots and three horizontal lines. Click on that and your messages will appear.
In order to enable this setting, you need to look in the same place where you enabled the AMP engine. Just click on the canvas and then click Runtime in the workflow Configuration window. Near the bottom of the screen is a checkbox that says Enable Performance Profiling.
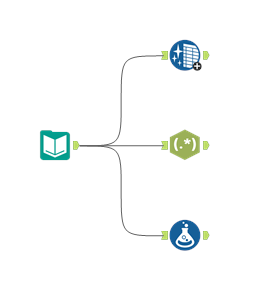
Don't Use the Data Cleansing Tool
Some of the tools built into Alteryx are actually macros in disguise (for those that don't know, a macro is an entire workflow packaged up into a single tool to allow for quicker implementation of a process that will be frequently repeated). If you right click on the Data Cleansing tool and click Open Macro: Cleanse.yxmc, you can view the workflow that runs every time the Data Cleansing tool is used. Take a look at that macro below to get an idea of why this is such a slow tool.
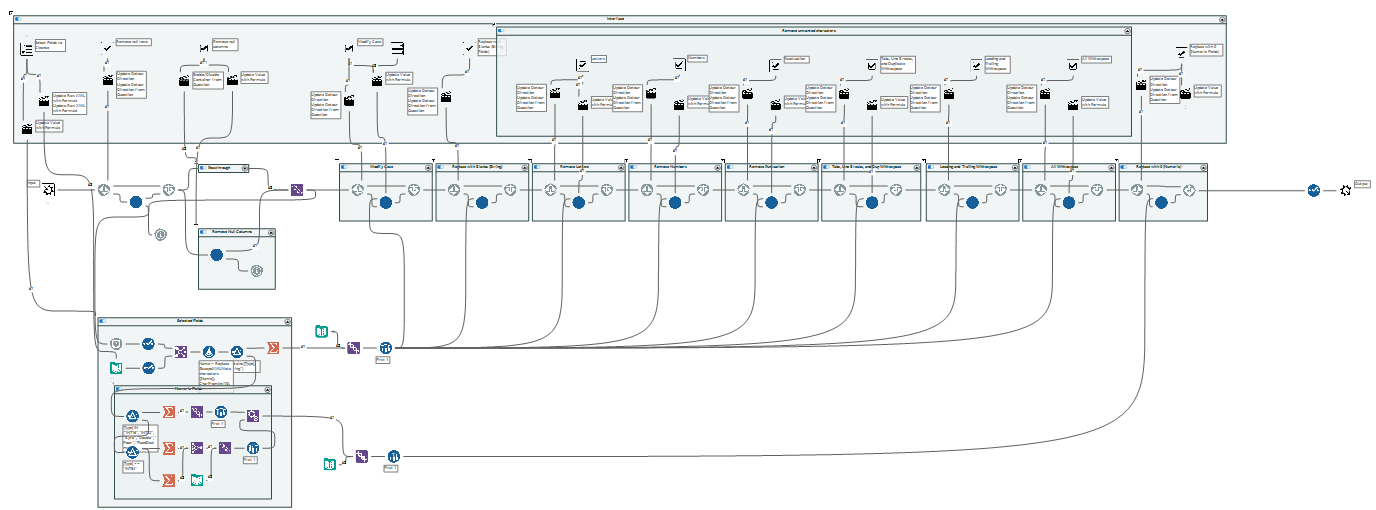
The Data Cleansing tool actually comprises dozens of tools. Those blank, blue circles in the center of the workflow are also macros that each contain multiple tools. The poor workflow performance caused by using a Data Cleansing tool is not worth the convenience of not having to type out a function or two in the Formula tool.
Take a look at this example from Alteryx Challenge 120. The dataset contains nearly 2 million records regarding popular baby names from a range of years. One of the required steps is to parse out the year from a field called FileName (for example: when the value of FileName is names.zip|||yob1880.txt, the year is 1880).
I enabled Performance Profiling and did this three different ways: once by removing any non-numeric characters with the Data Cleansing tool, once with RegEx, and once by using the LEFT and RIGHT functions in a Formula tool.
Take a look at the results:
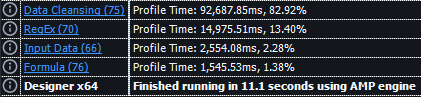
The Data Cleansing tool took far longer than the RegEx, Formula, and Input Data tools combined. RegEx was slower than the Formula tool but often a greater level of complexity in the parsing will necessitate its usage. The Formula tool was the fastest method. Imagine how big a difference this would make in a workflow with dozens of tools instead of just four.
The improved performance that comes with not using a Data Cleansing tool is well worth the extra effort. Another option that's often even faster than the Formula tool is the Multi-Field Formula tool.
Use the Multi-Field Formula Tool
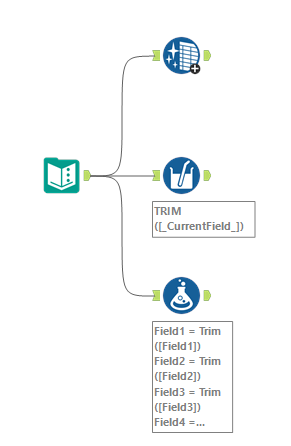
This is essentially a powered-up version of the Formula tool that allows you to perform the same functions to multiple fields simultaneously. One instance in which you could use a Multi-Field Formula tool is to trim leading and trailing whitespace from fields (instead of using a Data Cleansing tool). Just check the fields you want to trim at the top of the Configuration window and then type in TRIM([_CurrentField_]) in the expression editor at the bottom. You can deselect the option to output the results as new versions of the fields so that you'll overwrite them instead. As an added bonus, you can also change the data type of the resulting fields, which is not possible in the Formula tool.
I decided to test this out by trimming whitespace from eight fields using three different methods: using a Data Cleansing tool, using a Multi-Field Formula tool, and using eight formulas in one Formula tool.
Take a look at the Performance Profiling messages I got:
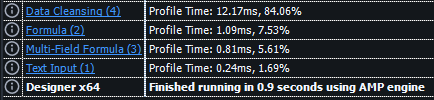
The Data Cleansing tool was by far the least efficient method. The difference between the Multi-Field Formula tool and the Formula tool was smaller but the Multi-Field Formula tool was still better. In a single row of data created by Text Input, these differences weren't discernible without the Performance Profiling messages. In a dataset with millions of rows, however, they would be much more pronounced.
Disable Browse Tools
Browse tools are useful during development because they allow you to view the entire dataset, as well as relevant summary statistics. The downside is that rendering the entire dataset is a big task, which makes Browse tools pretty slow. They're also not useful once workflows are put in production because they don't influence the final output. You could remove them from the workflow entirely but that would mean that you'd have to add them all back in if you wanted to make changes to the workflow and use those Browse tools to help you in the process.
An alternative is to leave them in place but disable them. This is in the same place as a few of the other settings mentioned above. Just click on the canvas, click Runtime in the Configuration window, and check Disable All Browse Tools.
Sort Only When Necessary
The Sort tool is one of the slower tools in Alteryx since it has to compare each record to every other record in the dataset. While it's useful in development since it gives you a clearer picture of the composition of the data, it shouldn't appear very often in a workflow that's in production. It can be necessary to use before a Multi-Row Formula tool or before sampling to keep only the top or bottom values based on a particular field but otherwise it's really only helpful when formatting data neatly before outputting it to a file or database.
Short-Term Solutions
There are a few things you can do that won't speed up your final workflow but will save you time as you're continuously running it during development.
Cache and Run
Sometimes you have a lengthy workflow but only need to troubleshoot the last tool. The issue is that running the workflow runs all of the tools, which can take a long time. The solution is to right click on the tool just to the left of the one you're editing and select Cache and Run Workflow. This will run the whole workflow and cache the results of the portion of the workflow culminating in that tool. The tools from the cached portion will be encased in bubbles.
The next time you run the workflow, it will take those cached results and feed them through the uncached portion of the workflow, rather than running all the tools from the beginning. This can dramatically speed things up during development. The downside is that if you have to change something in a cached tool, you will need to clear the cache.
Work with a Sample of the Data
If your dataset is big, there's no need to have the whole thing flow through your workflow every time you run it. Taking a few thousand rows to use during development can save you a lot of time. Just remember to swap in the full dataset and test it out before moving the workflow to production.
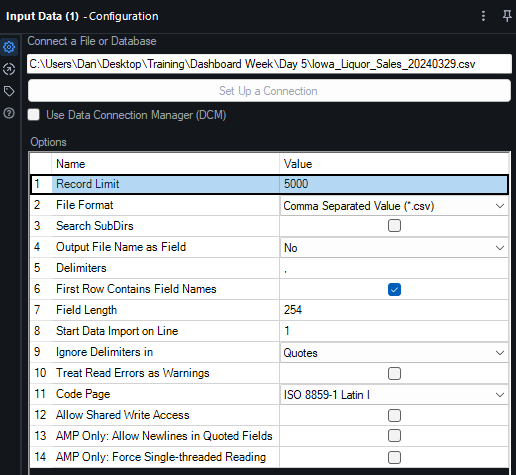
In order to do this, you don't need to bring in the full dataset and then use a Sample tool. You can limit the number of records in the Configuration window of an Input Data tool. Just click on Record Limit and type in whatever number you feel is appropriate.
Use Containers
Rather than letting your entire workflow run every time you want to test one part of it, you can put a finished part (or a part that you want to work on later) in a container to ensure Alteryx won't try to run those tools. Just select all the tools you don't want to run by dragging your cursor over them, right click one of them, and click Add to New Container. Then you can click the button in the top left of the container to disable it. Disabled containers won't run whereas enabled containers will run the same way that tools outside of containers run.
This is different from the aforementioned caching in that no data would be coming out of the tools in the disabled container. This means that any tools fed by those tools wouldn't receive data and wouldn't be able to run. So using containers is best when you have a branch of a workflow that you're not currently working on, whereas caching is best when there are tools that you don't need to configure but that feed into tools that you're currently working on configuring.
Conclusions and Further Reading
I hope this blog helped you to make your workflows more efficient and to save you time during development. For more information on these tips and workflow optimization, check out the links below:
Workflow Optimization:
https://help.alteryx.com/current/en/designer/workflows/workflow-optimization.html
https://knowledge.alteryx.com/index/s/article/Tips-Tricks-2016-Workflow-Optimization-1583460190241
https://www.thedataschool.co.uk/theo-isaac/quick-easy-tips-to-speed-up-your-alteryx-workflow/
https://www.popautomation.com/post/top-10-alteryx-optimize
Data Types: https://help.alteryx.com/current/en/designer/file-types-support/data-types.html
Auto Field tool: https://help.alteryx.com/current/en/designer/tools/preparation/auto-field-tool.html
AMP Engine: https://help.alteryx.com/current/en/designer/workflows/alteryx-amp-engine.html
Engine Compatibility Mode: https://help.alteryx.com/current/en/designer/workflows/alteryx-amp-engine/engine-compatibility-mode.html
Memory Use: https://help.alteryx.com/current/en/designer/get-started/user-settings/memory-use.html
YXDB Files: https://help.alteryx.com/current/en/designer/data-sources/alteryx-database-file-format.html
Performance profiling with the AMP engine: https://help.alteryx.com/current/en/designer/workflows/alteryx-amp-engine/performance-profiling-with-amp-engine.html#performance-profiling-with-amp-engine